
Before you start
Install only what you plan to use. Start with AgentX and one working agent. Add voice, desktop control, or a second machine later.
Choose your starting point
| I want to… | What I need | Start here |
|---|---|---|
| Explore without a model account | A source installation; the demo uses scripted replies | Source setup, then demo |
| Run agents and use the browser dashboard | Docker or Node.js; a model connection | Core setup |
| Chat inside the dashboard | Running dashboard, daemon, and configured agent | In-page chat |
| Use the OpenCode terminal interface | Core setup + OpenCode v2 or newer | Terminal setup |
| Talk to agents on my Mac | Core setup + compatible Mac + speech setup | Desktop setup |
| Point at controls or inspect my screen | Desktop helper + permissions + relevant model credentials | Computer use |
| Connect agents on two machines | Core setup on both + private network + pairing the machines | Networking |
The daemon is the background service that runs agents. The dashboard is the browser interface connected to it. A provider supplies the AI model. An API key is a private credential for that provider. The examples below use an agent with the ID support; use your own agent's ID.
Core setup
Install Git if running git --version in a terminal says the command is not found. The install instructions use Git to download AgentX.
Choose one installation path. Docker runs the daemon and dashboard in containers. A source installation runs them directly on your machine.
Option A: use Docker
Install Docker Desktop or Docker Engine. Start Docker before continuing.
Terminal: check that Docker answers:
shdocker version docker compose versionFollow Install AgentX with Docker.
Ready when: docker version shows a responding server and the dashboard opens after starting Compose. You do not need host Node.js for this path. Native macOS desktop tools must be installed on the Mac itself; they do not run inside the Linux container.
Option B: run from source
Install Node.js 22.19 or newer, up to 26, from Node.js downloads. Node 22 is what the maintainers run day to day.
Terminal: install pnpm 10 (the package manager AgentX is built with) and check both versions:
shnpm install -g pnpm@10 node --version pnpm --versionConfirm Node reports
v22.…and pnpm reports10.…, then follow Run from source.
Help: pnpm installation. If installation reports a native compilation error, follow node-gyp's platform prerequisites for Python and a C/C++ toolchain.
Commands in these guides
agentx means an installed CLI. When running from source, use node dist/cli.js in its place after pnpm build. Run commands from the directory containing your agentx.json. The install page explains the 0.27.0 package limitation.
Connect one model
For a first setup, the browser wizard's Anthropic API (BYO key) option is a direct route:
- Follow Anthropic's getting-started guide to obtain API access and a key.
- Browser: open AgentX
/setup, select that engine, and enter the key. - Save the agent and restart the daemon as described in Your first agent.
- Send a short test message.
Ready when: the agent returns a real response. Other engines need their own installed runtime and authentication. Installing OpenCode, Docker, or the desktop app does not provide model credentials. Provider usage and account requirements are separate from AgentX; see costs.
Desktop assistant
Required: Apple Silicon Mac, macOS 14 or newer, Node.js 22, configured AgentX agent, and Apple's command-line tools. Check Apple menu → About This Mac for your chip and macOS version.
Terminal: install Apple's tools if needed:
shxcode-select --installComplete the macOS installer, then check
xcrun --find swiftc. See Apple's developer tools help.Terminal: from the folder that holds your
agentx.json, install and start the assistant:shagentx desktop install --agent supportReplace
supportwith an ID fromagentx agent list.Complete speech setup if you want voice, and permissions for the features you use.
Terminal: run
agentx desktop statusto check that the assistant is set to start at login.
The installer handles: building both native apps, installing them under ~/Applications, remembering your agent and daemon URL, and starting the assistant at login.
You handle: installing Apple's tools, configuring the daemon/model, setting up a speech backend, and accepting macOS permissions. The installer does not download Whisper or grant permissions.
Voice input and spoken replies
Choose one transcription option. You can later configure both for fallback.
Option A: ElevenLabs
Create an API key following ElevenLabs' key guide. Enable the access needed for speech-to-text and, if used, text-to-speech.
Terminal: create the local configuration folder and open a key file:
shmkdir -p ~/.agentx touch ~/.agentx/elevenlabs-key.txt chmod 600 ~/.agentx/elevenlabs-key.txt nano ~/.agentx/elevenlabs-key.txtPaste only the key, save with Control–O, press Enter, and exit with Control–X. A key file works for login-launched apps without relying on terminal environment variables.
Terminal: restart the assistant:
shagentx desktop stop agentx desktop start
Ready when: holding Option–Space, speaking a short question, and releasing produces a transcript and reply. This option needs internet access and available provider quota. Official help: ElevenLabs quickstart.
Option B: local Whisper
This is an optional local transcription setup for Apple Silicon. It needs Python, FFmpeg, and the mlx-whisper package. The MLX Whisper project documents installation and model downloads.
Terminal: install Python and FFmpeg (an audio converter). If you use Homebrew:
shbrew install python ffmpegTerminal: install Whisper into its own Python environment (a venv: a private folder of Python packages that doesn't affect the rest of your Mac):
shpython3 -m venv ~/.agentx/whisper-env ~/.agentx/whisper-env/bin/python -m pip install mlx-whisperTerminal: create a launcher at the path AgentX expects. It also makes Homebrew's FFmpeg available to the login app:
shmkdir -p ~/.local/bin cat > ~/.local/bin/mlx_whisper <<'SH' #!/bin/sh export PATH="/opt/homebrew/bin:/usr/local/bin:/usr/bin:/bin:$PATH" exec "$HOME/.agentx/whisper-env/bin/mlx_whisper" "$@" SH chmod +x ~/.local/bin/mlx_whisper ~/.local/bin/mlx_whisper --helpIf you already have a launcher there, keep it and check that it works instead of replacing it.
Terminal: test with a short audio file of your own:
sh~/.local/bin/mlx_whisper /path/to/test.wav --model mlx-community/whisper-large-v3-turboReplace the audio path. The first run downloads the model and needs internet access and free disk space. Let it finish before testing the desktop hotkey.
In the terminal, run the desktop install again so the assistant can find FFmpeg when it starts at login:
shagentx desktop install --agent supportA login app does not see your terminal's settings. The installer records the folder where it found FFmpeg. If it prints
ffmpeg was not found, finish step 1 and run it again.In the terminal, run
agentx doctor. Under Desktop, it should reportffmpeg reachable by the desktop app.
Ready when: the test creates a text transcript. Restart the desktop assistant and test Option–Space. Without ElevenLabs, spoken replies use macOS say. Local transcription does not make a remotely hosted agent model work offline.
Option C: Parakeet, built into the app
The desktop app can also transcribe with Parakeet, which needs no Python and no FFmpeg. It downloads a 483 MB model the first time and has no Arabic. Keep Option B installed as well: Whisper answers while Parakeet downloads or loads. If you speak Arabic, stay on Whisper. See Speech to text on this Mac to switch it on.
macOS permissions
- Open System Settings → Privacy & Security.
- Select the permission from the table below.
- Turn on access for the app named in the macOS prompt.
- Relaunch the app if macOS asks.
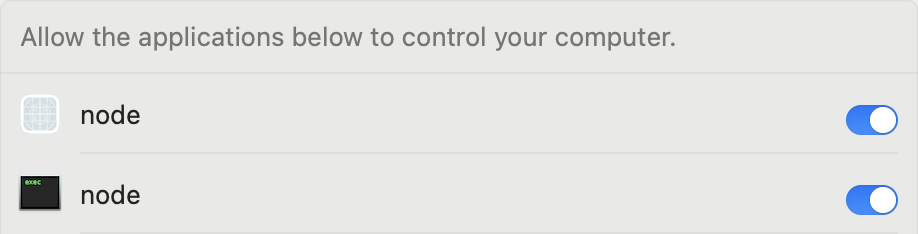
| Permission | Needed for | App normally requesting it |
|---|---|---|
| Microphone | Recording your spoken request | AgentX Desktop |
| Accessibility | Reading controls and interacting with apps | AgentX Helper / the invoking app |
| Screen Recording or Screen & System Audio Recording | Reading text off the screen (OCR, optical character recognition) and screen captures | AgentX Helper / the invoking app |
Official help: Accessibility access, microphone access, screen recording access. An app may appear only after it first requests access. A running desktop login service alone does not prove these permissions are enabled.
Computer use
Install the desktop helper and grant the permissions above first. Then choose the capability:
| Capability | Additional requirement | Check |
|---|---|---|
Locate and highlight a control (point) | Available ui-element decision seat (see below) | agentx point "the search field" while that field is visible |
Describe the screen (look) | OpenRouter key and access to a vision model | agentx look "What window is visible?" |
| Verify a visible result | Vision setup; optional screen-state seat | agentx look "The command palette is open" --verify |
| Run a guided lesson | Dependencies needed by that lesson | agentx teach lists the available lessons |
For look, create a key using the OpenRouter quickstart, then save it as a single line in ~/.agentx/openrouter-key.txt with owner-only permissions, following the key-file steps above. Screen captures are sent to the vision provider. Test using a demo workspace.
Some features hand a small, fixed-choice question to a fast "decision" model instead of the main agent. Each such question is a seat (for example ui-element: which control on screen matches your words). Jev is the decision model AgentX uses for seats. To set it up, follow the decision-seat setup. The current jev backend reads OPENROUTER_API_KEY; the direct typesafe backend reads TYPESAFE_API_KEY. Put the appropriate variable in your AgentX .env, enable the desired seats, and restart the daemon. The vision key file is not a substitute for the decision backend's environment variable. Confirm backend access before enabling a seat in active mode.
Ready when: the specific command you intend to use works. point highlights without clicking; lessons can click and type. The computer-use walkthrough explains how to check results.
Terminal interface
- Install OpenCode (a terminal-based coding assistant) using its official v2 instructions.
- Terminal: run
opencode --version. AgentX's integration requires v2 or newer. - Terminal: start your daemon.
- Terminal: run
agentx tui --agent support.
Ready when: OpenCode opens with the AgentX agent selected. If OpenCode is missing or too old, AgentX uses its built-in TUI. agentx tui --legacy selects that fallback directly. See TUI connection limits before using an authenticated remote daemon.
Two machines and A2A
A2A (agent-to-agent) is how an agent on one machine hands work to an agent on another. The connected machines form a mesh.
- Install AgentX and configure a model on each machine that will run agents.
- Install Tailscale using the official setup guide, and join your private network (Tailscale calls it a tailnet).
- Follow AgentX's Tailscale guide to configure reachable addresses, pair peers, and load matching tokens.
- Terminal: run
agentx mesh list. Each peer showshealthy. - Send a small task to the other machine.
Ready when: the remote agent answers. Tailscale is one private-network option; it is not required for a single-machine setup. The separate standalone A2A server needs its own provider runtime and authentication; it does not automatically use a configured daemon agent.
Channels and workflows
For Telegram, you need a Telegram account and bot token; follow Connect Telegram. Other channels need their own account, credentials, and event-delivery configuration; use Channels to choose a supported integration. Test one incoming message before scheduling work that depends on it.
For the workflow assistant, you need a configured agent and workflows turned on. Terminal:
agentx config set workflows.enabled trueFollow the command's reload/restart result, then use Describe an automation. Ready when: the assistant returns a proposal and you can inspect it before applying or running it. A webhook or scheduled workflow also needs the corresponding channel or schedule configured.
Recording a tutorial
Screen Studio is optional. For the Screen Studio example, install the app and follow its recording guide, including macOS capture permissions. Confirm that a playable clip was saved.
agentx teach --record uses macOS screencapture instead. It does not require Screen Studio. See record a VS Code walkthrough.
Check it worked
- [ ] My chosen installation path works.
- [ ] My daemon is running and one agent answers a short message.
- [ ] I installed only the optional features I want.
- [ ] Each optional feature passes its own “Ready when” check.
There is no measured universal RAM or disk minimum for AgentX yet. Local speech models, several agents running at once, and kept recordings all change what you need.
If something is wrong
docker versionshows no server: Docker Desktop isn't running. Start it and try again.node --versionis belowv22.19or abovev26: install Node.js 22. AgentX doesn't run on other versions.- Installing reports a native compilation error: install the node-gyp platform prerequisites, then install again.
- An app is missing from System Settings › Privacy & Security: use the feature once so the app asks for access, then look again.
ffmpeg was not foundduringagentx desktop install: finish the FFmpeg step under local Whisper, then run the install again.- Anything else: run
agentx doctorand follow It's not answering.