
Get notified
AgentX can tap you on the shoulder when something happens: a task finishes, a job fails, or an agent needs you. This page sets that up from scratch, one step at a time.
A notification can reach you in three ways. You can use any of them on its own:
- On your phone, through the AgentX phone app. This is the default. If you prefer, the free ntfy app works too. ntfy ("notify") is a small service that sends a push message to a phone.
- On your Mac, as a banner in the top-right corner of the screen, with a short sound.
- In a chat app (Telegram or WhatsApp), for messages about tasks the agents run.
AgentX also respects Focus. While your Mac is in Focus (Do Not Disturb), it keeps messages back and sends them together when Focus ends.
You can change every setting in two places. Both save to the same settings file, agentx.json:
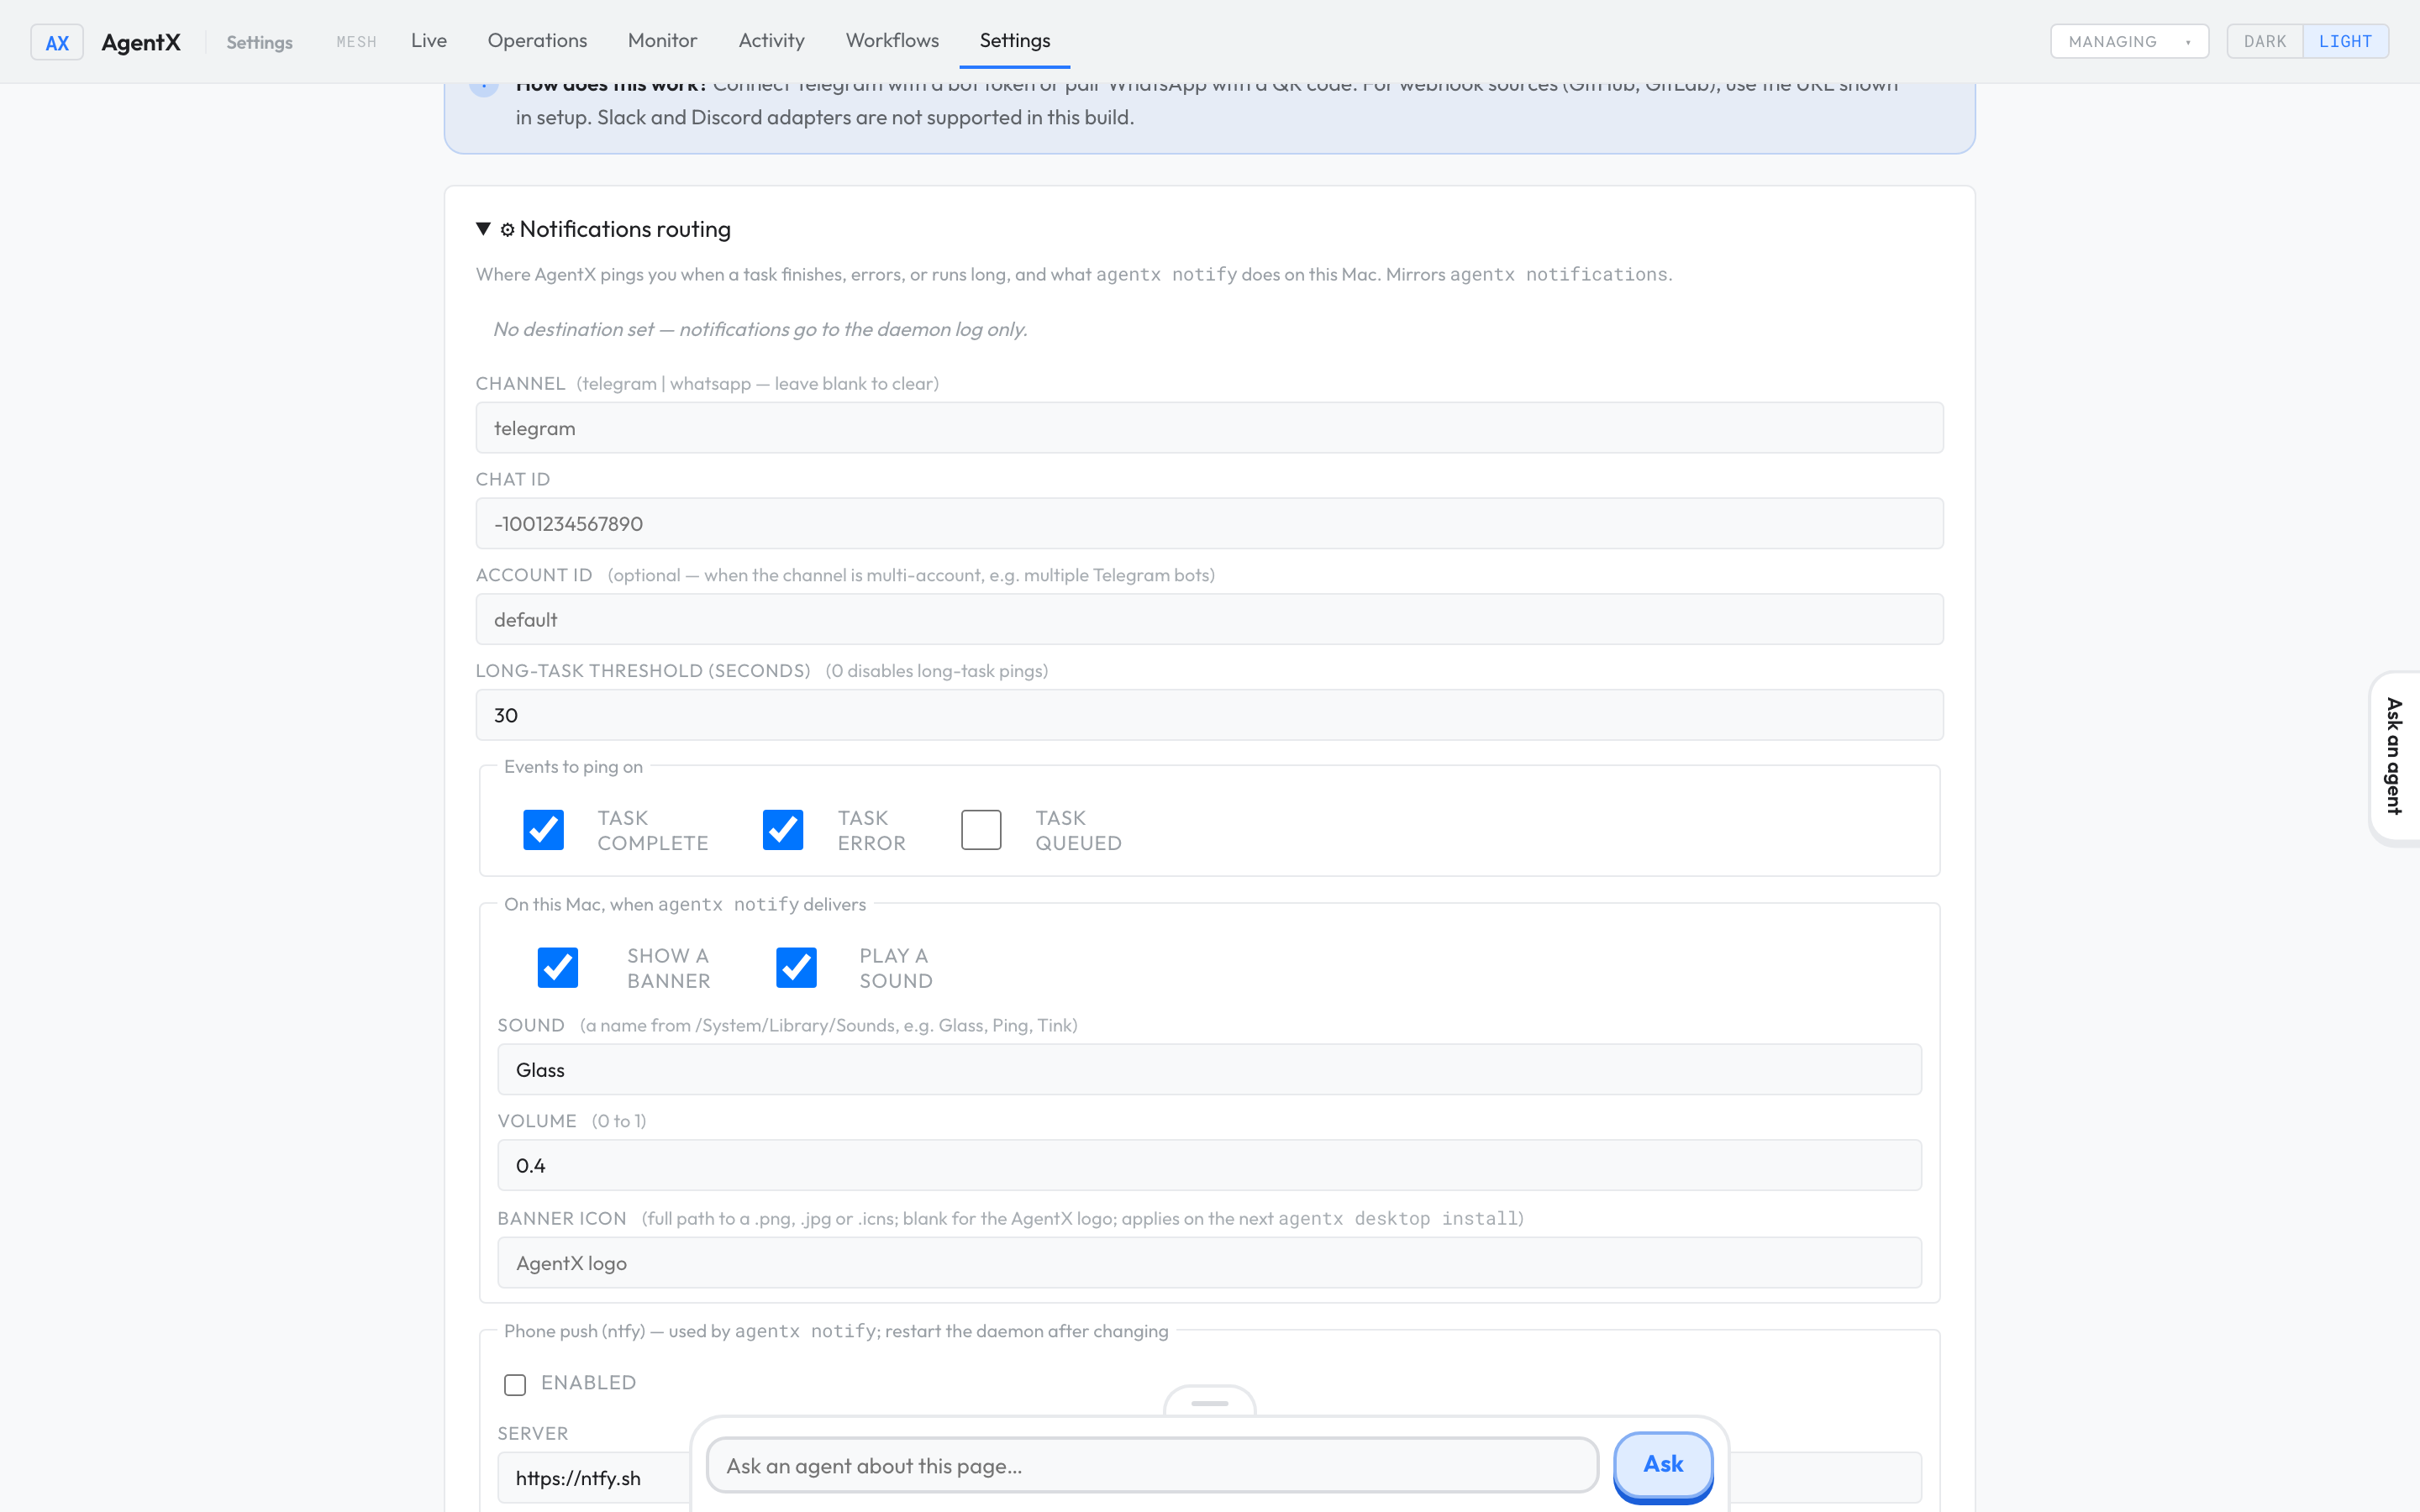
- The dashboard: open Settings, choose the Channels tab, and open Notifications routing.
- The terminal: the
agentx notificationscommand.
1. Get messages on your phone
With the AgentX phone app
- Install and pair the phone app.
- Follow Notifications on your phone: run
agentx app push-keysandagentx notifications push --subject mailto:you@example.com --enableon the computer, restart AgentX, then tap Turn on in the app's Alerts tab.
Once phone app notifications are on, agentx notify sends to the phone app.
With ntfy instead
Use ntfy if you don't use the phone app. agentx notify sends to ntfy when phone app notifications are off. If you turned both on, step 11 makes ntfy the default.
A topic is the name of your private message box on ntfy. On the public ntfy.sh server, anyone who knows the topic name can read it, so treat the name like a password.
Install the ntfy app on your phone from the App Store or Google Play.
Make up a long, random topic name, for example
agentx-8f3c1e0a9b7d.In the ntfy app, tap + and subscribe to that topic.
Open the
.envfile in the same folder as youragentx.json. (This file keeps secrets out ofagentx.json.)Add this line, using your own topic name:
shNTFY_TOPIC=agentx-8f3c1e0a9b7dIn the dashboard, open Settings → Channels → Notifications routing.
Under Phone push (ntfy), tick Enabled.
In Topic, type
${NTFY_TOPIC}. AgentX reads the real name from.env.Select Save notifications.
Restart AgentX so the change takes effect. In the terminal, run:
shagentx daemon stop && agentx daemon start --detachOnly if phone app notifications are also on: make ntfy the default for
agentx notify. In the terminal, run:shagentx notifications channel ntfy
The form never shows a saved topic or token again. It only says whether one is set.
Running your own ntfy server?
Put its address in Server (for example https://ntfy.example.com). If your topic is protected, add NTFY_TOKEN=… to .env and type ${NTFY_TOKEN} in Access token.
The same steps in the terminal
agentx notifications ntfy --topic '${NTFY_TOPIC}' --enable
agentx notifications ntfy --server https://ntfy.example.com --token '${NTFY_TOKEN}'   # own server only
agentx notifications channel ntfy   # only if phone app notifications are also on
agentx daemon stop && agentx daemon start --detach
Keep the single quotes, so your shell does not replace ${…} itself. --token "" removes a token, and --disable turns phone push off.
You can type the real topic name in the form instead of ${NTFY_TOPIC}. It is then stored in agentx.json, so do not share or commit that file.
2. See a banner on your Mac
Banners and sounds are on by default. They only happen on a Mac; on other computers AgentX skips them quietly.
Banners come from a small app called AgentX Helper. With it, banners show the AgentX logo. Without it, macOS shows them as coming from Script Editor, with Script Editor's icon.
| Right: AgentX Helper posts the banner | Wrong: the Script Editor icon |
|---|---|
 |  |
Install AgentX Helper
Before you start, check that:
- your Mac has an Apple chip (M1 or newer) and runs macOS 14 Sonoma or newer;
- Apple's command-line tools are installed. If you are not sure, run
xcode-select --installin the Terminal. It either starts the install or says they are already there.
agentx desktop install also installs the AgentX Desktop voice assistant and starts it when you log in. Run agentx desktop install --dry-run first to see what it will install, without changing anything.
Open the Terminal.
Go to the folder that holds your
agentx.json, for example:shcd ~/agentxRun:
shagentx desktop installThis builds AgentX Helper and puts it in the Applications folder inside your home folder. It takes a minute or two the first time.
Send a test message:
shagentx notify "Hello" --title "Test"macOS asks whether AgentX Helper may send notifications. Choose Allow.
Allow AgentX Helper to show banners
If you missed the question, or chose Don't Allow, turn it on by hand:
- Open the Apple menu and choose System Settings.
- Select Notifications in the sidebar.
- Scroll down to the list of apps and select AgentX Helper.
- Turn on Allow notifications.
- Select the Banners style.
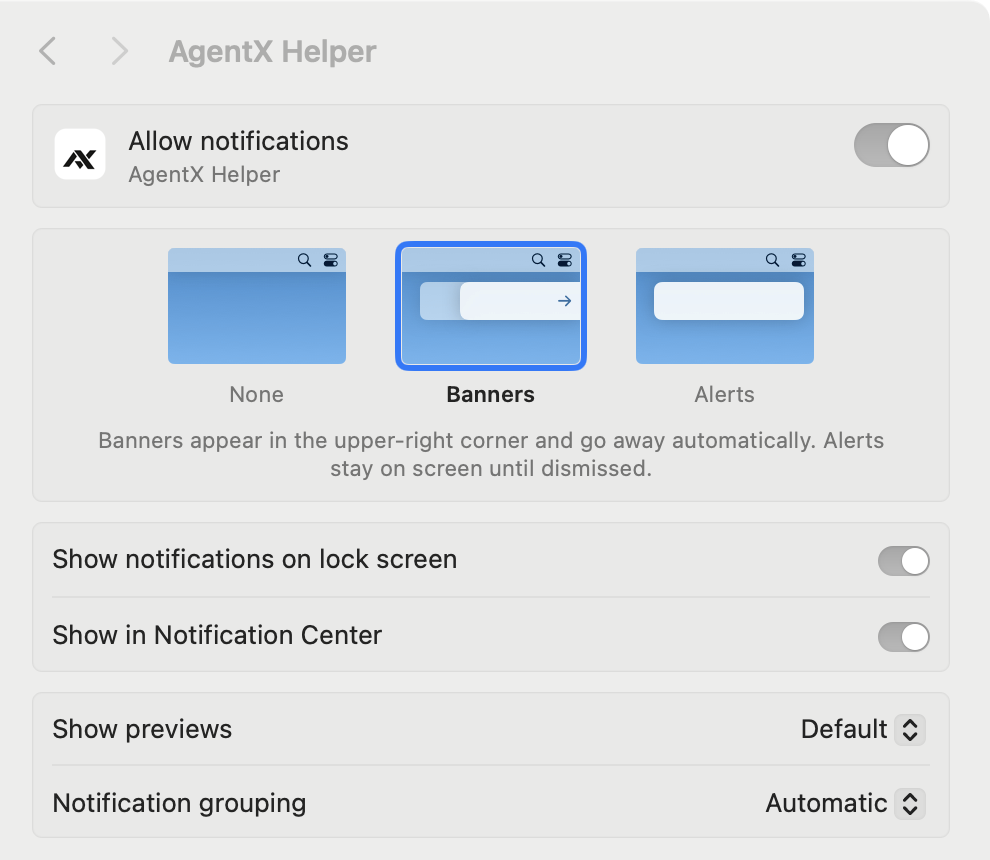
Run agentx notify "Hello" --title "Test" again. The banner should now show the AgentX logo.
Choose the sound and volume
- In the dashboard, open Settings → Channels → Notifications routing.
- Under On this Mac, tick or untick Show a banner and Play a sound.
- In Sound, type the name of a macOS sound: Glass (the default), Ping, Tink, Submarine, or any other name in
/System/Library/Sounds. - In Volume, type a number from 0 (silent) to 1 (full). The default is 0.4.
- Select Save notifications.
The same steps in the terminal
agentx notifications local --banner on --sound on --sound-name Tink --volume 0.6Use your own icon
The banner shows the AgentX logo unless you choose another picture. macOS takes the icon from the app that posts the banner, so a new icon means rebuilding AgentX Helper.
- Save a square picture of at least 512 × 512 pixels as
.png,.jpgor.icns. - In the dashboard, under On this Mac, type the picture's full path in Banner icon, for example
/Users/you/Pictures/team-logo.png. - Select Save notifications.
- In the terminal, run
agentx desktop installto rebuild the helper with the new icon. - If macOS asks again whether AgentX Helper may send notifications, choose Allow. A rebuilt app counts as new to macOS.
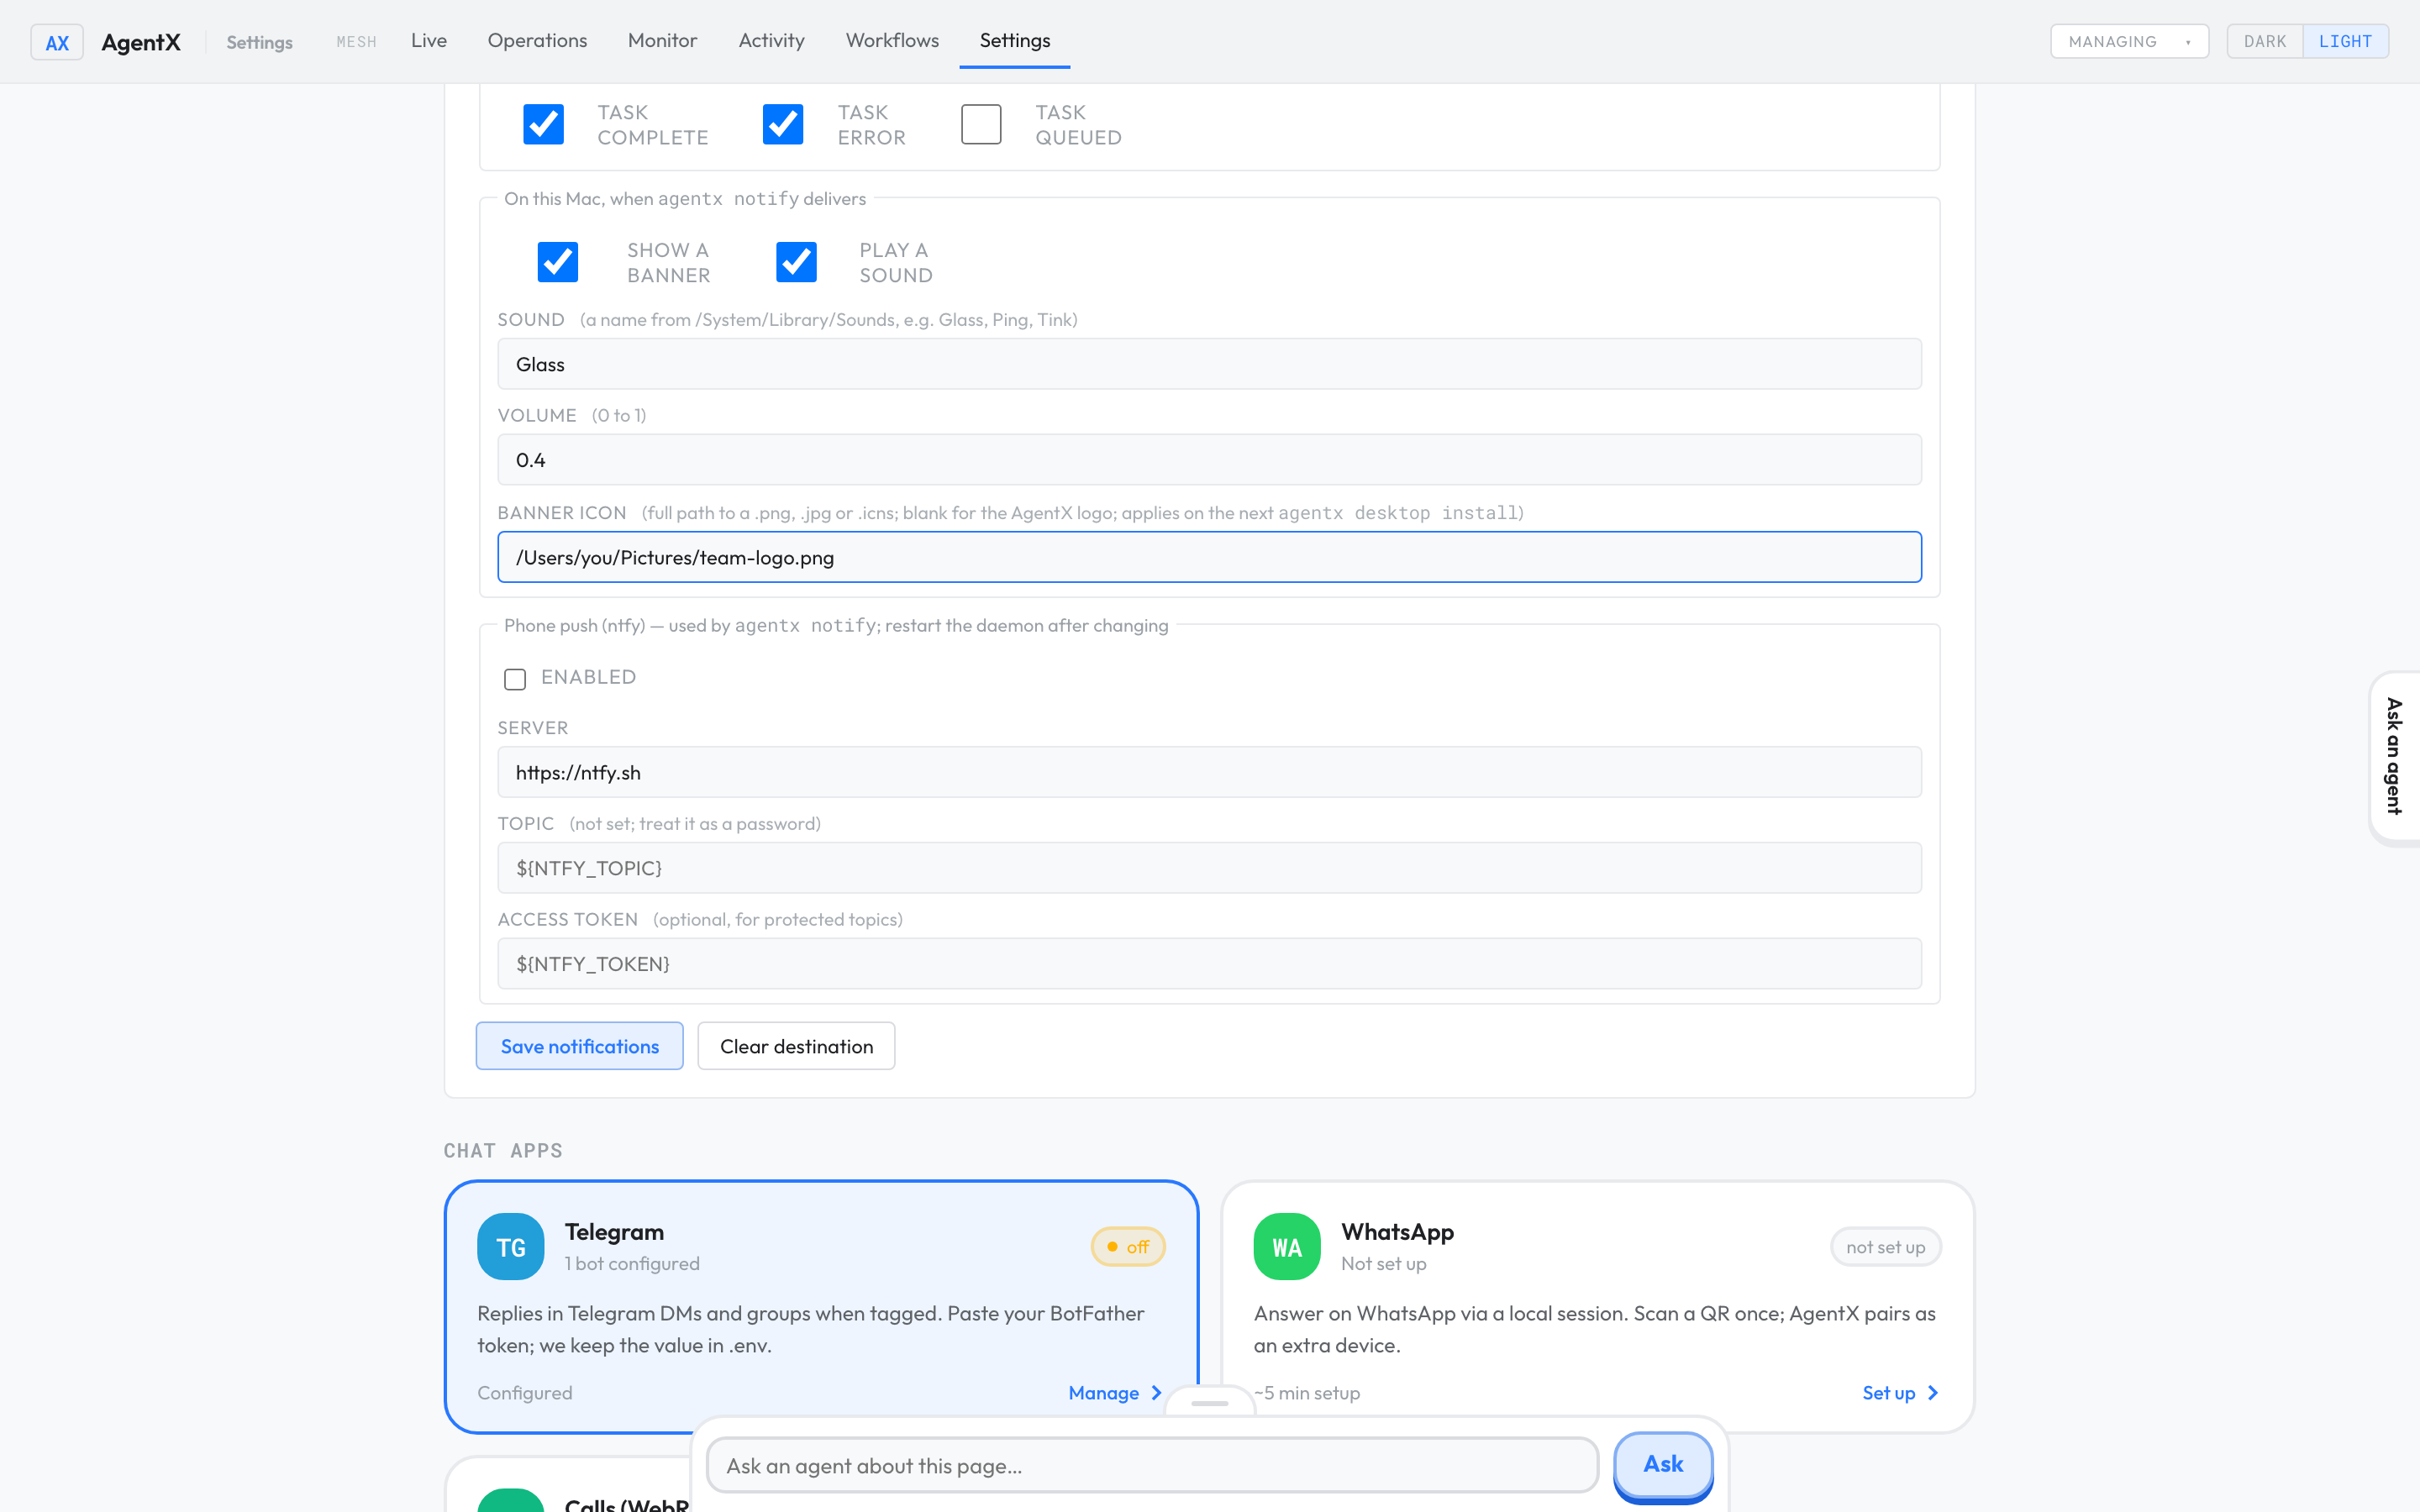
To go back to the AgentX logo, empty Banner icon, save, and run agentx desktop install again.
The same steps in the terminal
agentx notifications local --icon ~/Pictures/team-logo.png
agentx desktop install
agentx notifications local --icon ""   # back to the AgentX logo
Where AgentX looks for the helper
In this order: the path in the AGENTX_MAC_HELPER environment variable, if set; then ~/Applications/AgentX Helper.app; then a helper built inside the AgentX installation (apps/mac-helper/build). It does not depend on the folder you run agentx from.
3. Get task messages in a chat app
Agents can report on their own work: when a task finishes, fails, or waits in line. These messages go to one chat.
- Connect the chat app first (Telegram or WhatsApp).
- In the dashboard, open Settings → Channels → Notifications routing.
- In Channel, type
telegramorwhatsapp. - In Chat ID, type the chat's ID. For a Telegram group it starts with
-100. - Fill in Account ID only if you run more than one bot on that channel.
- Under Events to ping on, tick the events you want: Task complete, Task error, Task queued.
- In Long-task threshold, type how many seconds a task may run before AgentX tells you it is still working.
0turns this off. The default is 30. - Select Save notifications.
To stop these messages, select Clear destination.
The same steps in the terminal
agentx notifications route --channel telegram --chat-id -1001234567890
agentx notifications event taskQueued on
agentx notifications threshold 60
agentx notifications route --clear   # stop
4. Hold messages during Focus
While you are in Focus, a message gets no push, no banner and no sound. AgentX keeps it and sends everything held as one message when Focus ends. A message sent with --urgent always goes through.
AgentX can tell you are in Focus in two ways.
macOS Focus (Do Not Disturb). macOS keeps this in a private file, so AgentX needs permission to read it:
- Open System Settings → Privacy & Security → Full Disk Access.
- Turn on the app that runs AgentX: Terminal, iTerm, or whichever app starts the AgentX daemon (the background service).
Without that permission, AgentX cannot see Focus and never holds a message, so nothing is lost.
A manual hold, without turning on macOS Focus:
- Create the file
~/.agentx/focus.jsoncontaining{"active": true}. - To release the messages, delete the file or change it to
{"active": false}.
AgentX checks every 30 seconds. When Focus ends, it sends what it held: one message per destination, with one banner and one sound.
5. Send a notification yourself
Scripts and scheduled jobs can call agentx notify:
agentx notify "Build finished" --title "CI"
agentx notify "Production is down" --title "Alert" --urgent
agentx notify --status        # Focus state and anything held
agentx notify --flush # deliver what is held now| Option | What it does |
|---|---|
--title <text> | Notification title (default AgentX) |
--priority <1-5> | ntfy priority (default 4); the phone app ignores it |
--urgent | Deliver even during Focus |
--from <who> | Shown in a held digest, so you know who sent what |
--channel, --chat-id | Deliver somewhere other than the default channel (notifications.channel, which is push) |
--no-banner, --no-sound | Skip the banner or the sound for this message |
-c <path> | Read the settings from this agentx.json |
--proof | Capture the banner as it shows and print the picture's location; see Capture the screen at the right moment |
--json | Print the result as JSON |
agentx notifyreads its settings from./agentx.json. When it runs from another folder, as scheduled jobs do, add-c /path/to/agentx.json. Without a settings file it uses the defaults.- It waits for the banner and the sound to finish before it exits (about two seconds), so a job that ends straight afterwards still gets both.
- The phone push goes through the running AgentX daemon. If the daemon is stopped, the command reports an error, but the banner and sound still play.
Check it worked
- In the terminal, run
agentx notifications show. - Check the
channelline: it names whereagentx notifysends. For the phone app it sayspush, and thepushline sayson,subject setandkeys set. For ntfy it saysntfy, and thentfyline saysonandtopic set. - Check that the
local.helperline says AgentX Helper posts banners with the AgentX icon. If it says anything else, follow theFix:line under it. - Run
agentx notify "Hello" --title "Test". - Check that your phone buzzes, and that a banner with the AgentX logo appears on the Mac with a sound.
- Create
~/.agentx/focus.jsoncontaining{"active": true}and send another message. - Run
agentx notify --statusand check that the message is listed as held. - Delete
~/.agentx/focus.json. Within 30 seconds, the held message arrives.
agentx doctor runs the same helper check under Notifications, along with its other checks.
If something is wrong
agentx notifications show and agentx doctor explain what they find about AgentX Helper in plain words:
| What you see | What it means | What to do |
|---|---|---|
| "AgentX Helper is not installed" | Banners come from Script Editor. | Run agentx desktop install, then send a test and choose Allow. |
| "macOS has not asked yet" | The helper has never tried to post a banner. | Run agentx notify "Hello" --title "Test" and choose Allow. |
| "macOS does not allow AgentX Helper to notify" | Someone chose Don't Allow, or it was turned off. | Follow Allow AgentX Helper to show banners. |
| "its banner style is None" | Allowed, but set to show nothing on screen. | In System Settings → Notifications → AgentX Helper, choose Banners. |
| "AgentX Helper is too old" | The helper was built by an older AgentX. | Run agentx desktop install to update it. |
Other problems:
| Problem | What to do |
|---|---|
| No banner at all | Turn off Do Not Disturb. If the helper is not installed, also allow System Settings → Notifications → Script Editor. |
| The phone does not buzz | With the phone app, see Notifications on your phone. With ntfy, check that the topic in the ntfy app matches NTFY_TOPIC exactly, that agentx notifications show lists channel ntfy, and that you restarted AgentX after saving. |
| Nothing is held during Focus | Give Full Disk Access to the app that runs AgentX (step 4), or use ~/.agentx/focus.json. |
| A scheduled job uses the wrong settings | Add -c /path/to/agentx.json to its agentx notify command. |
| The new icon does not show | Run agentx desktop install after changing Banner icon, then allow notifications again if asked. |