
Settings — connect the team
Settings is where you manage agents, the apps they answer from, schedules and access. Everything here is saved to agentx.json, the AgentX settings file on your machine. When you save, the running daemon (the AgentX background service) picks up the change on its own. Saving does not start a stopped daemon.
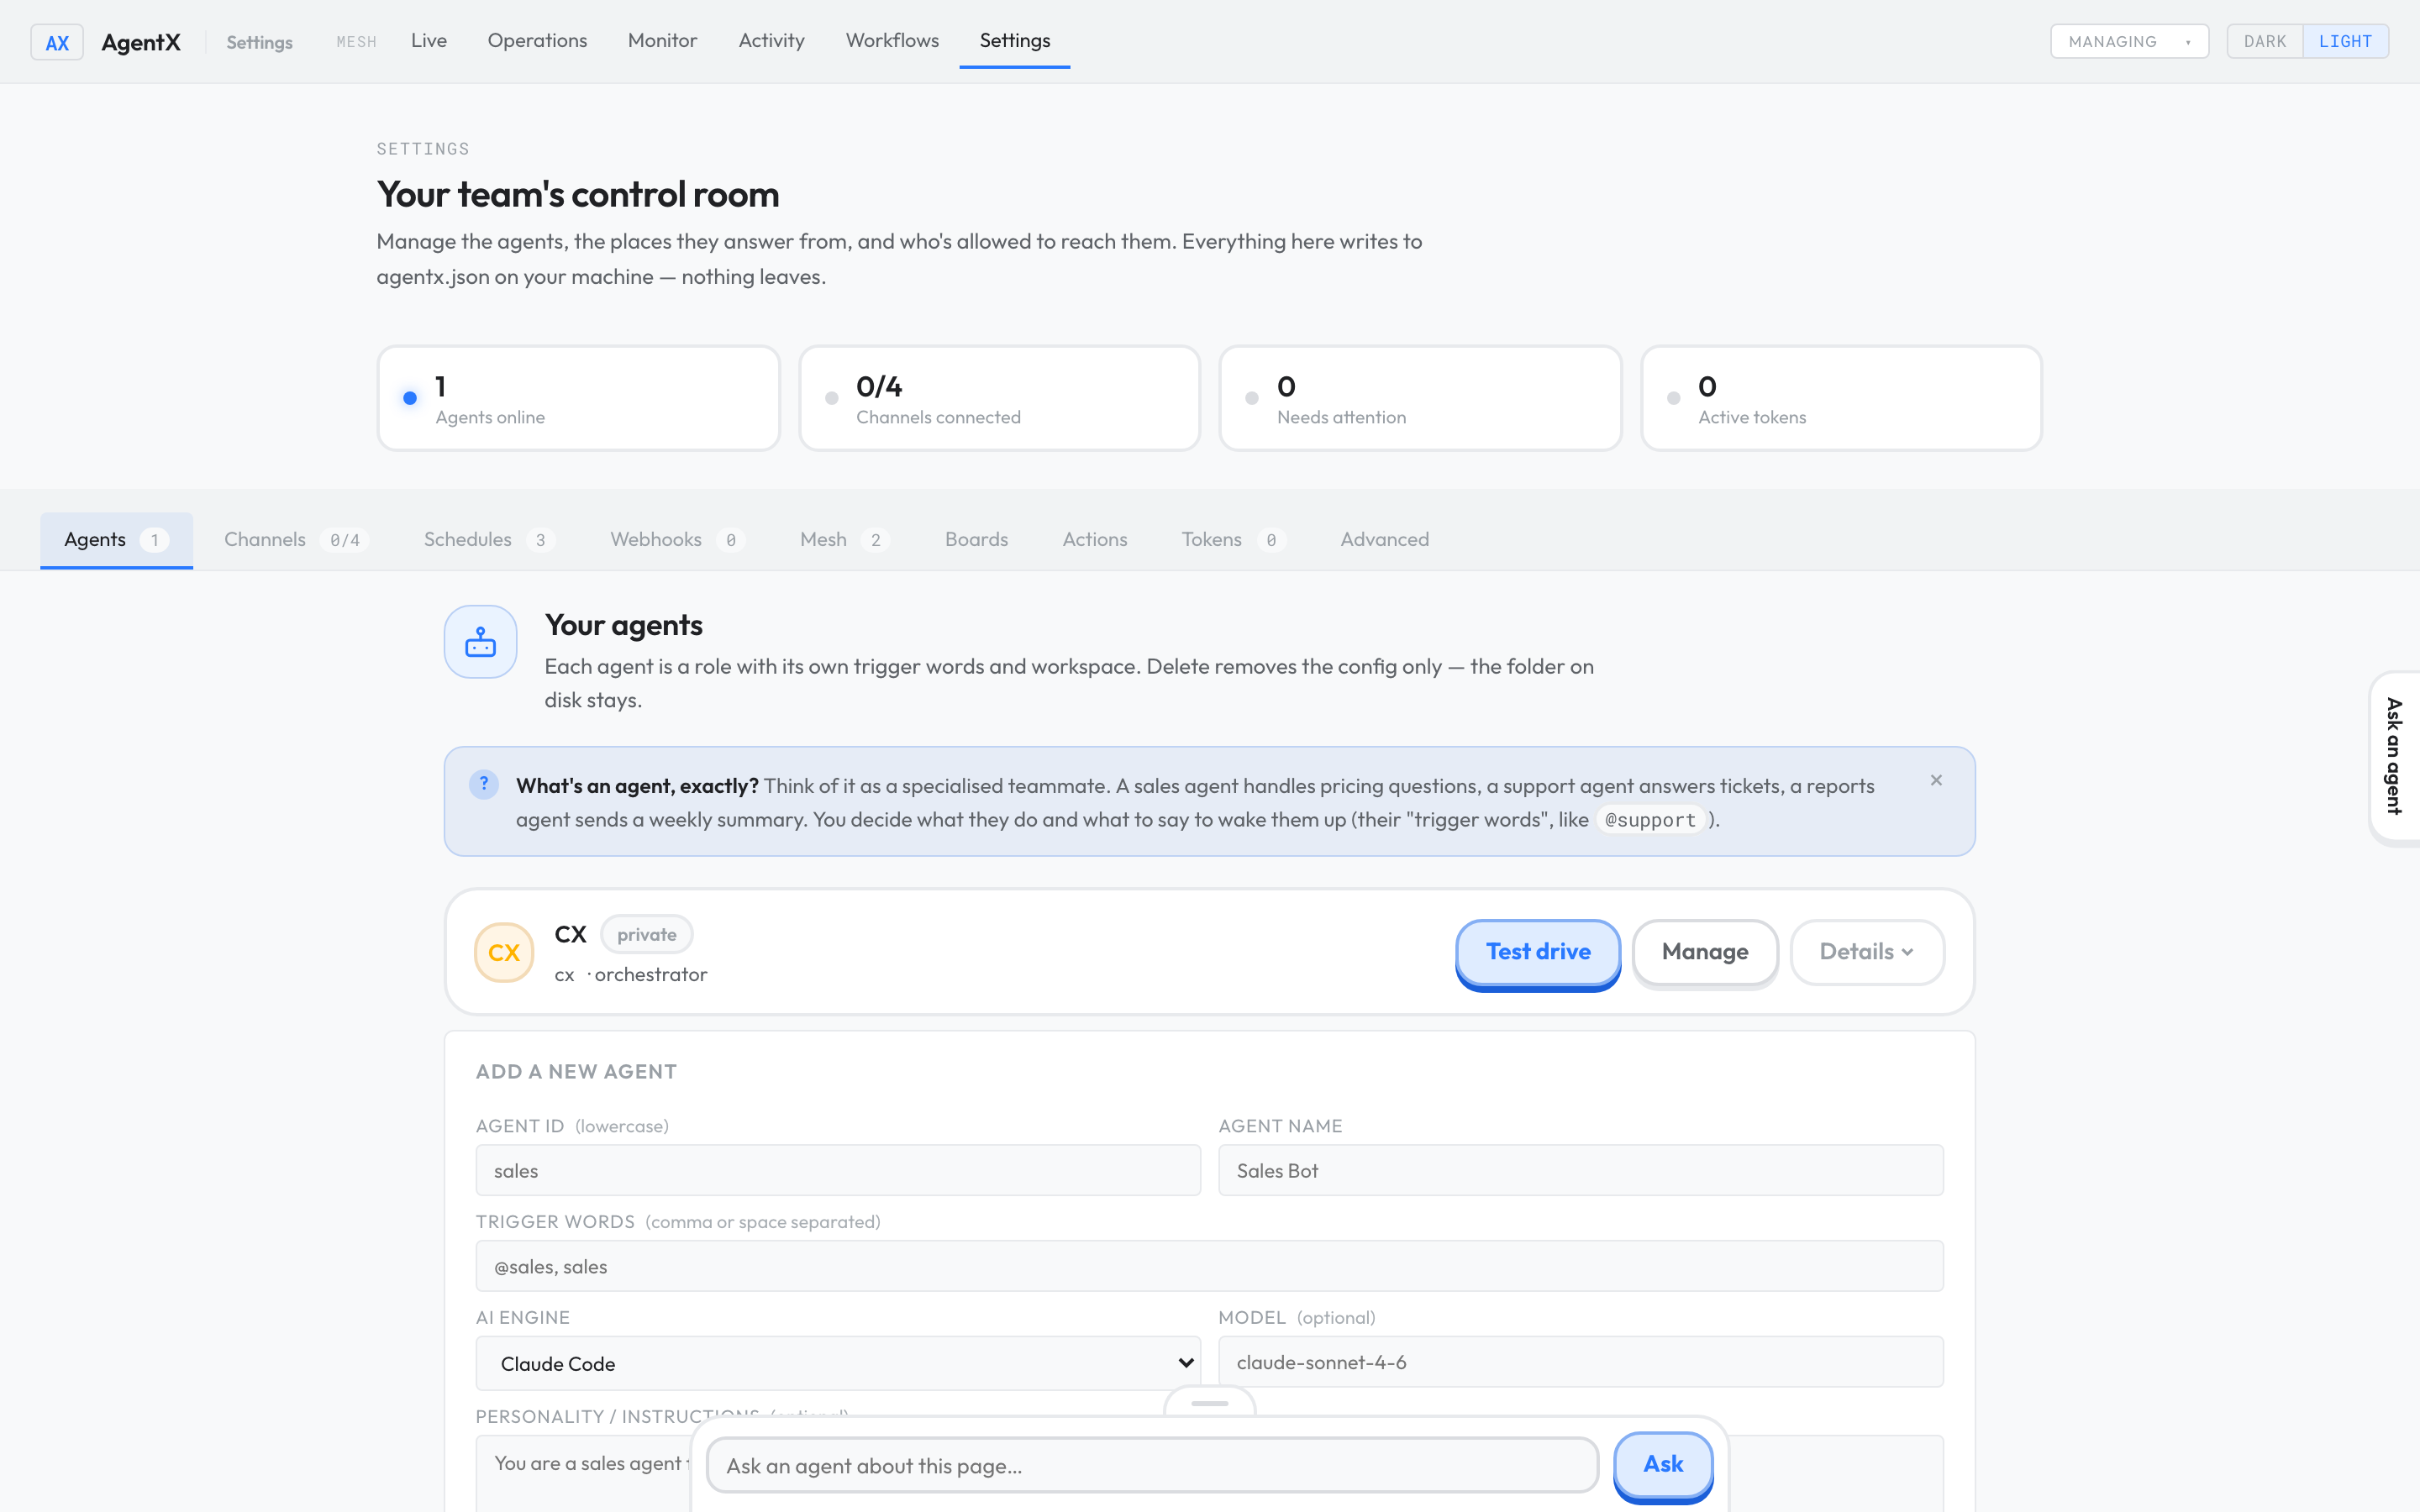
The demo's agent is local and uses scripted replies.
| Tab | What it's for |
|---|---|
| Agents | Your agents, with Test drive to try one and Manage to change it |
| Channels | The chat apps agents answer from (Telegram, WhatsApp, calls, GitLab, GitHub), and Notifications routing |
| Schedules | Jobs an agent runs on a timer. See Send a daily report |
| Webhooks | Addresses other services call when something happens there |
| Mesh | Other AgentX machines this one shares work with. See Add a second machine |
| Boards | The task boards shown in the dashboard |
| Actions | Reusable commands and web calls that workflows can run |
| Tokens | Access tokens: passwords for scripts and other machines that talk to AgentX |
| Advanced | The whole settings file, to read or edit directly |
A Business tab (org chart, projects, and which chat belongs to which client) appears only when the business features are switched on (business.enabled in agentx.json).
Try an agent
- Browser: open the dashboard and select the Settings tab.
- On Agents, find the agent and select Test drive.
- Type a small task with an answer you can check, and send it.
- Read the reply in the panel. Test drives use the agent's real model, so they may cost money.
Connect a chat app
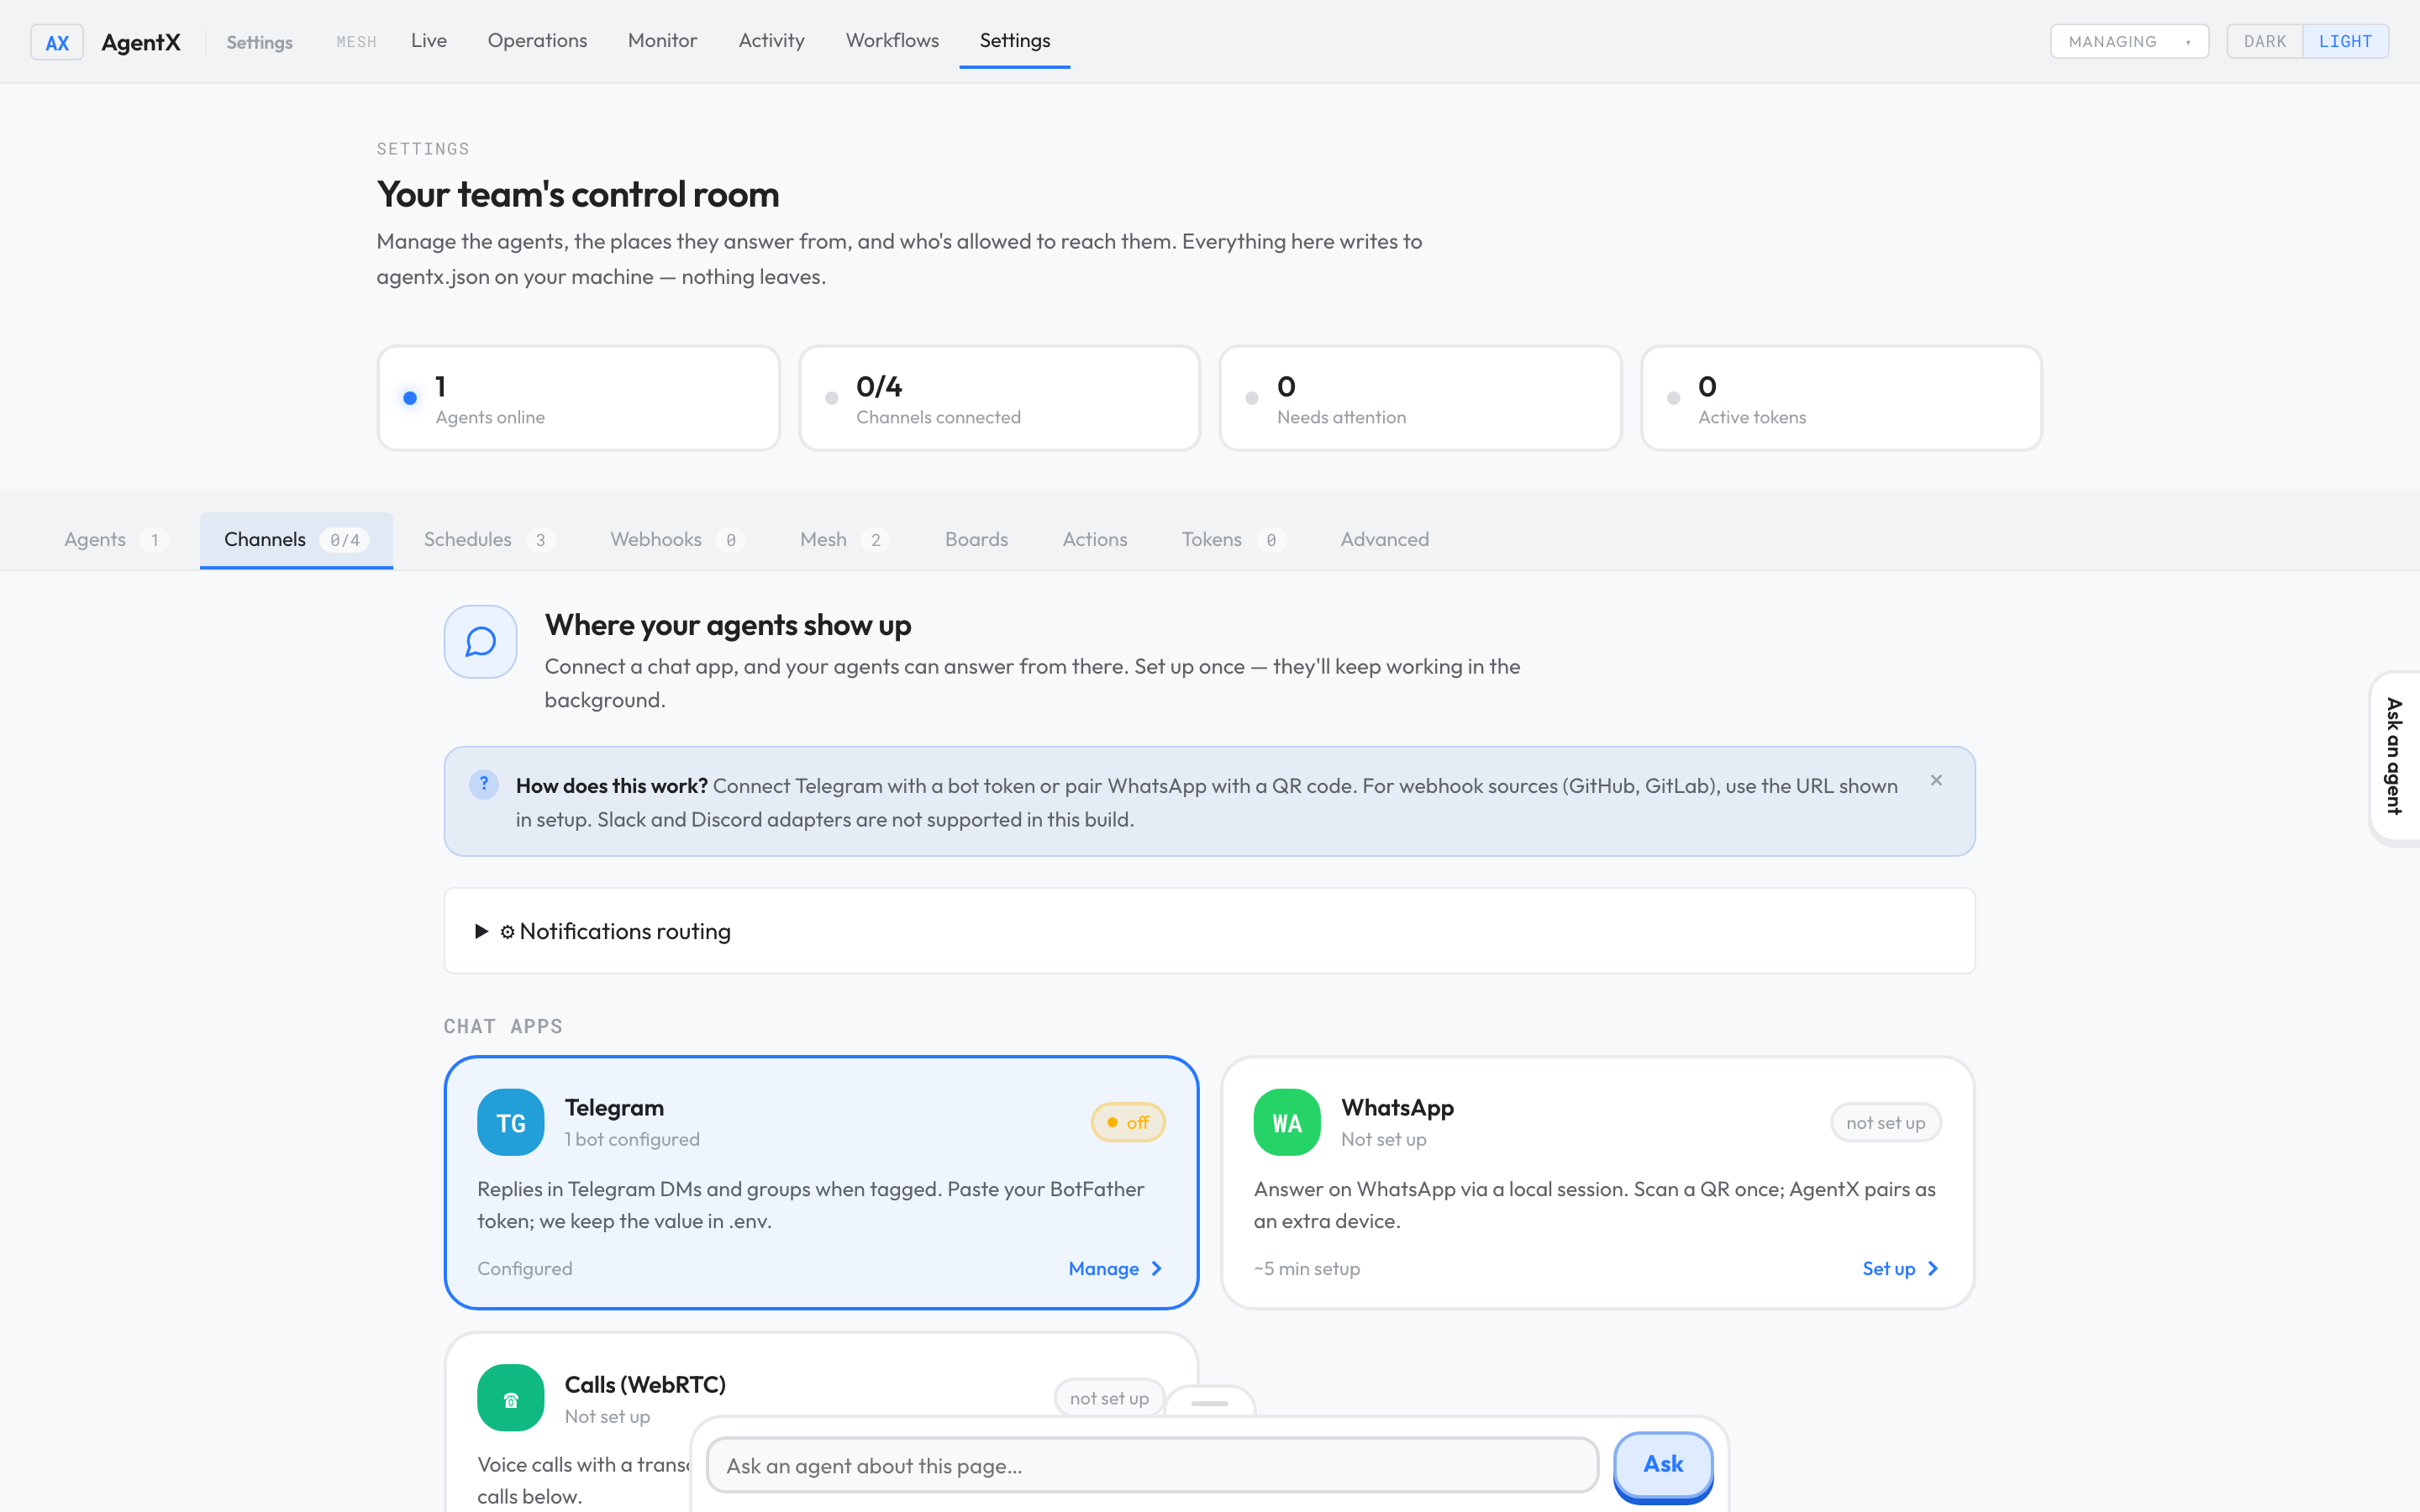
- Browser: in Settings, select Channels.
- Select the app's card, such as Telegram, then Set up or Manage.
- Follow that app's form. For Telegram, see Connect Telegram: the form asks for the name of the setting that holds the bot token, and the token itself goes in the
.envfile next toagentx.json, never in the dashboard.
A configured card does not mean the connection is live: the card shows live only when the channel is switched on.
Create an access token
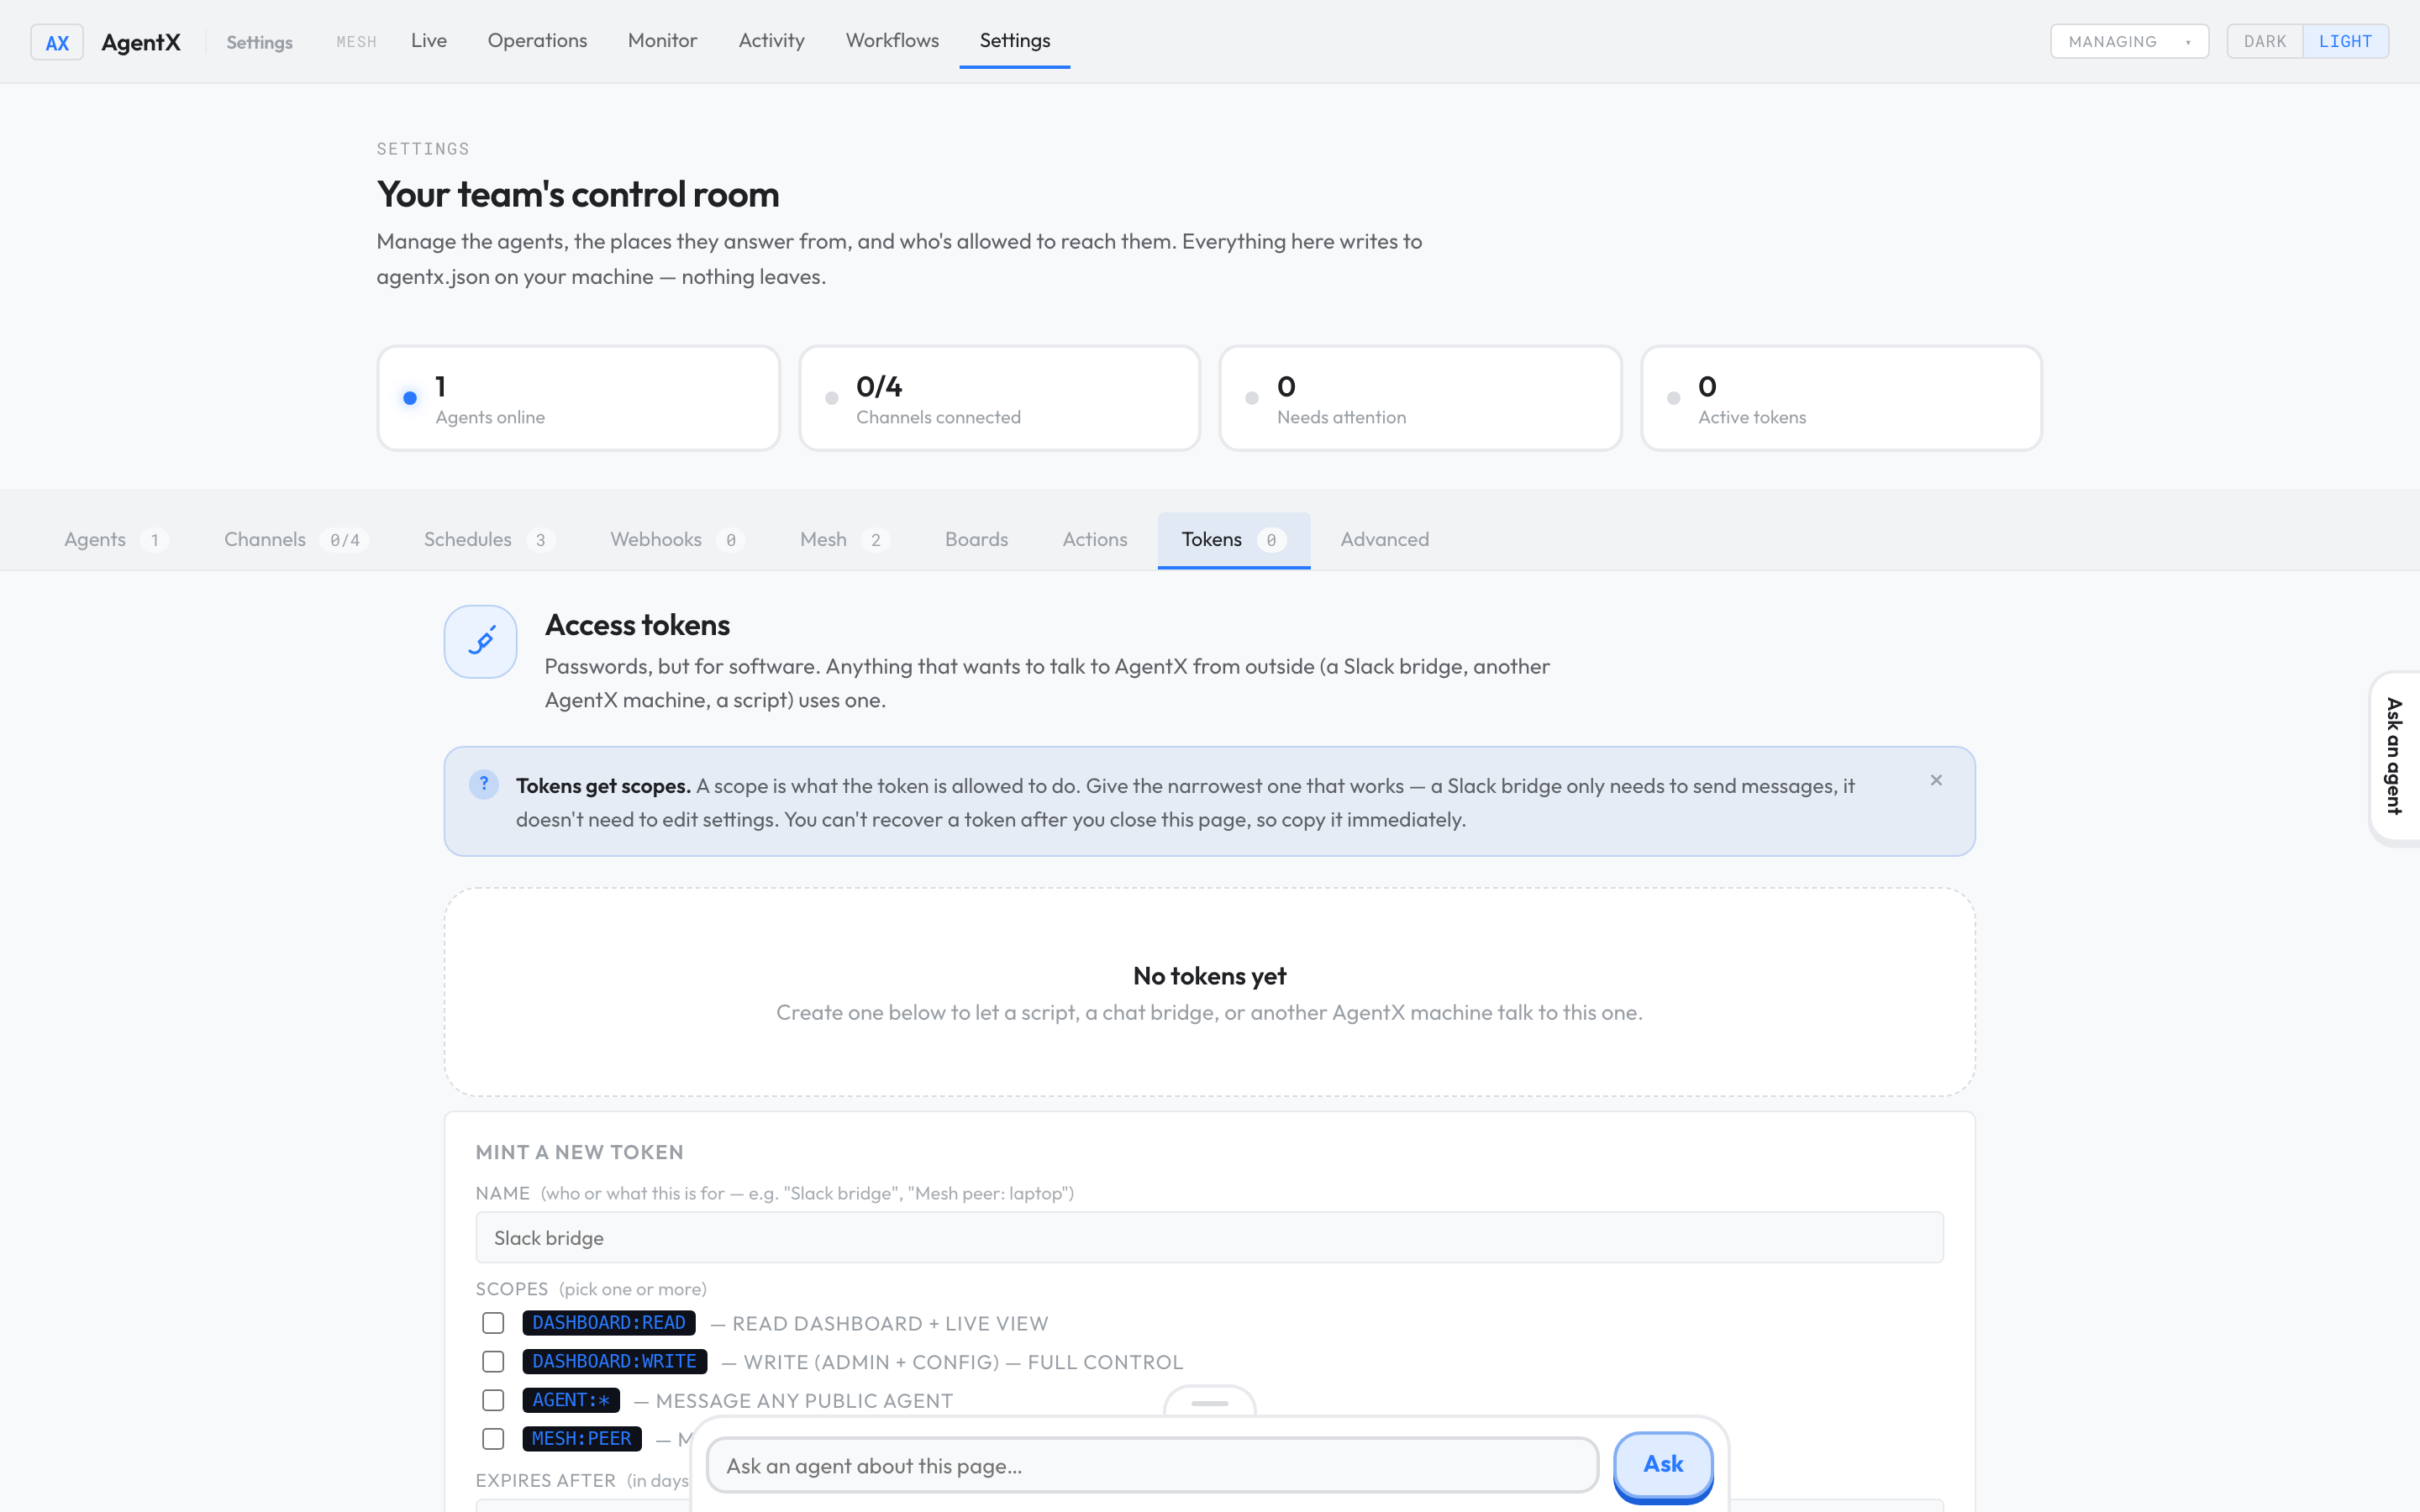
- Browser: in Settings, select Tokens.
- Under Mint a new token, type a Name that says who it's for.
- Tick the Scopes it needs. Pick the fewest that work.
- Optionally set Expires after a number of days.
- Select Create token.
- Copy the token straight away. It's shown only once.
Keep tokens out of screenshots, chats and support requests. See Keep it safe.
Review schedules
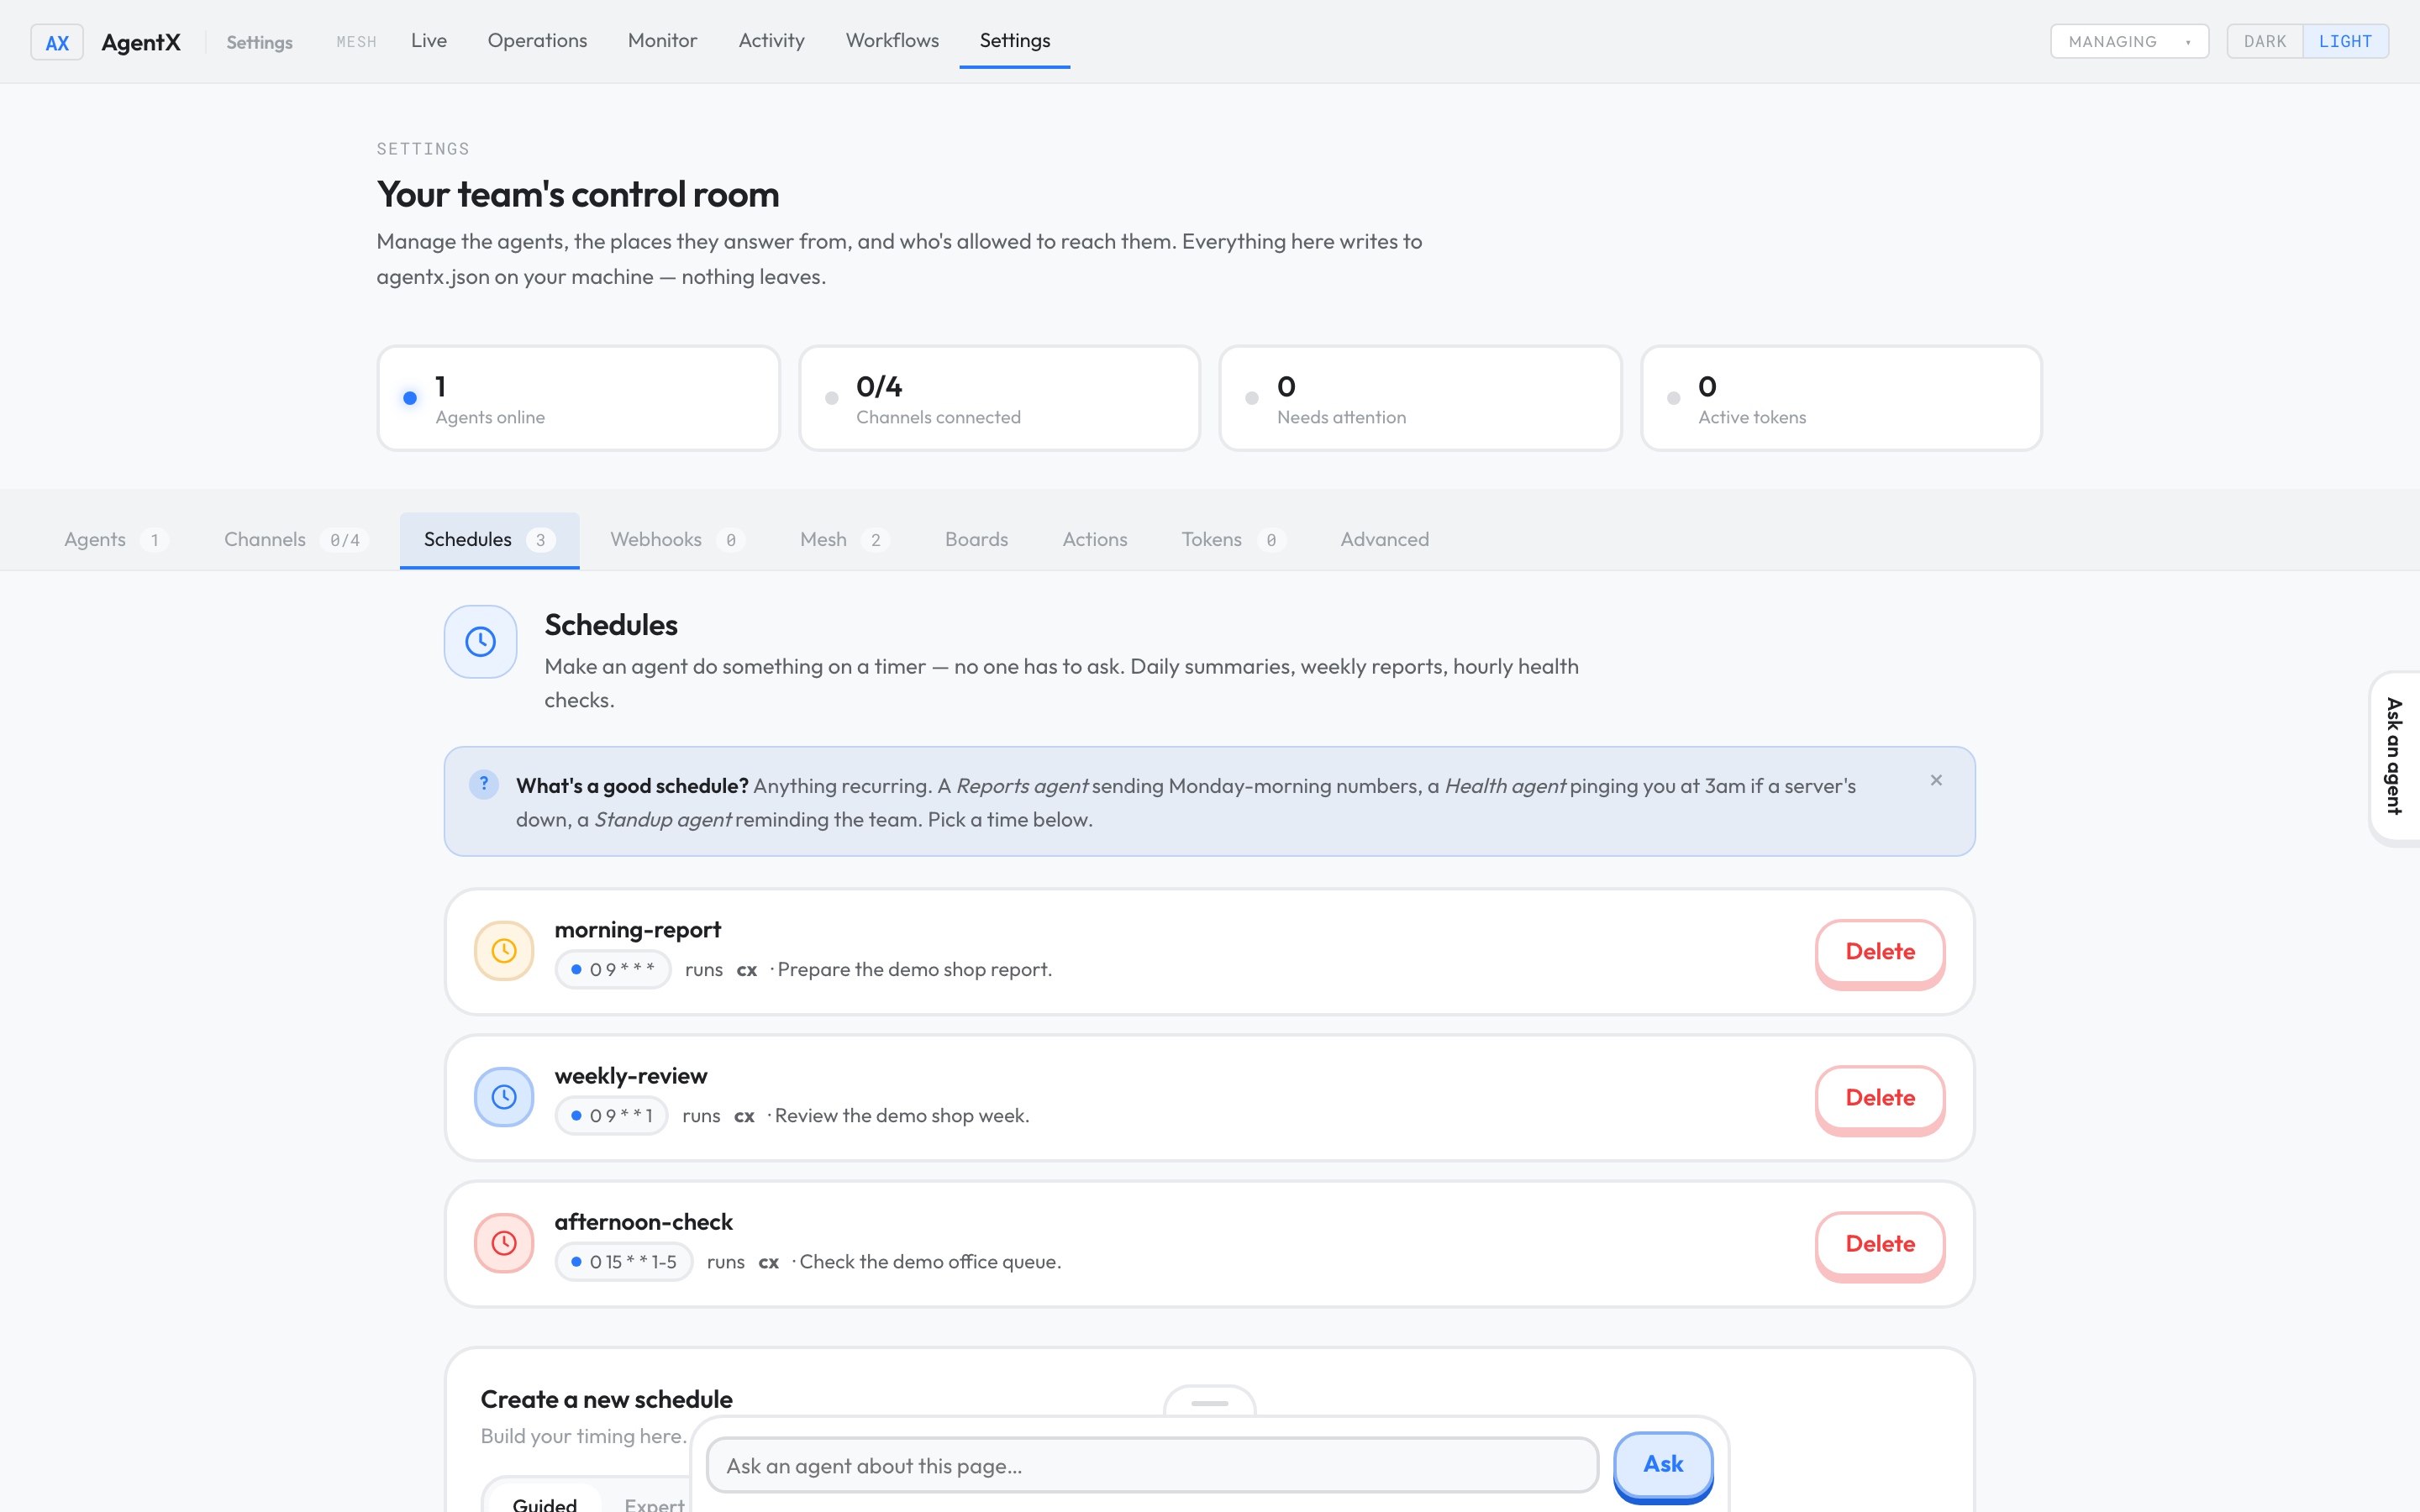
- Browser: in Settings, select Schedules.
- For each schedule, check it is switched on and that its time zone is the one you expect.
Webhooks
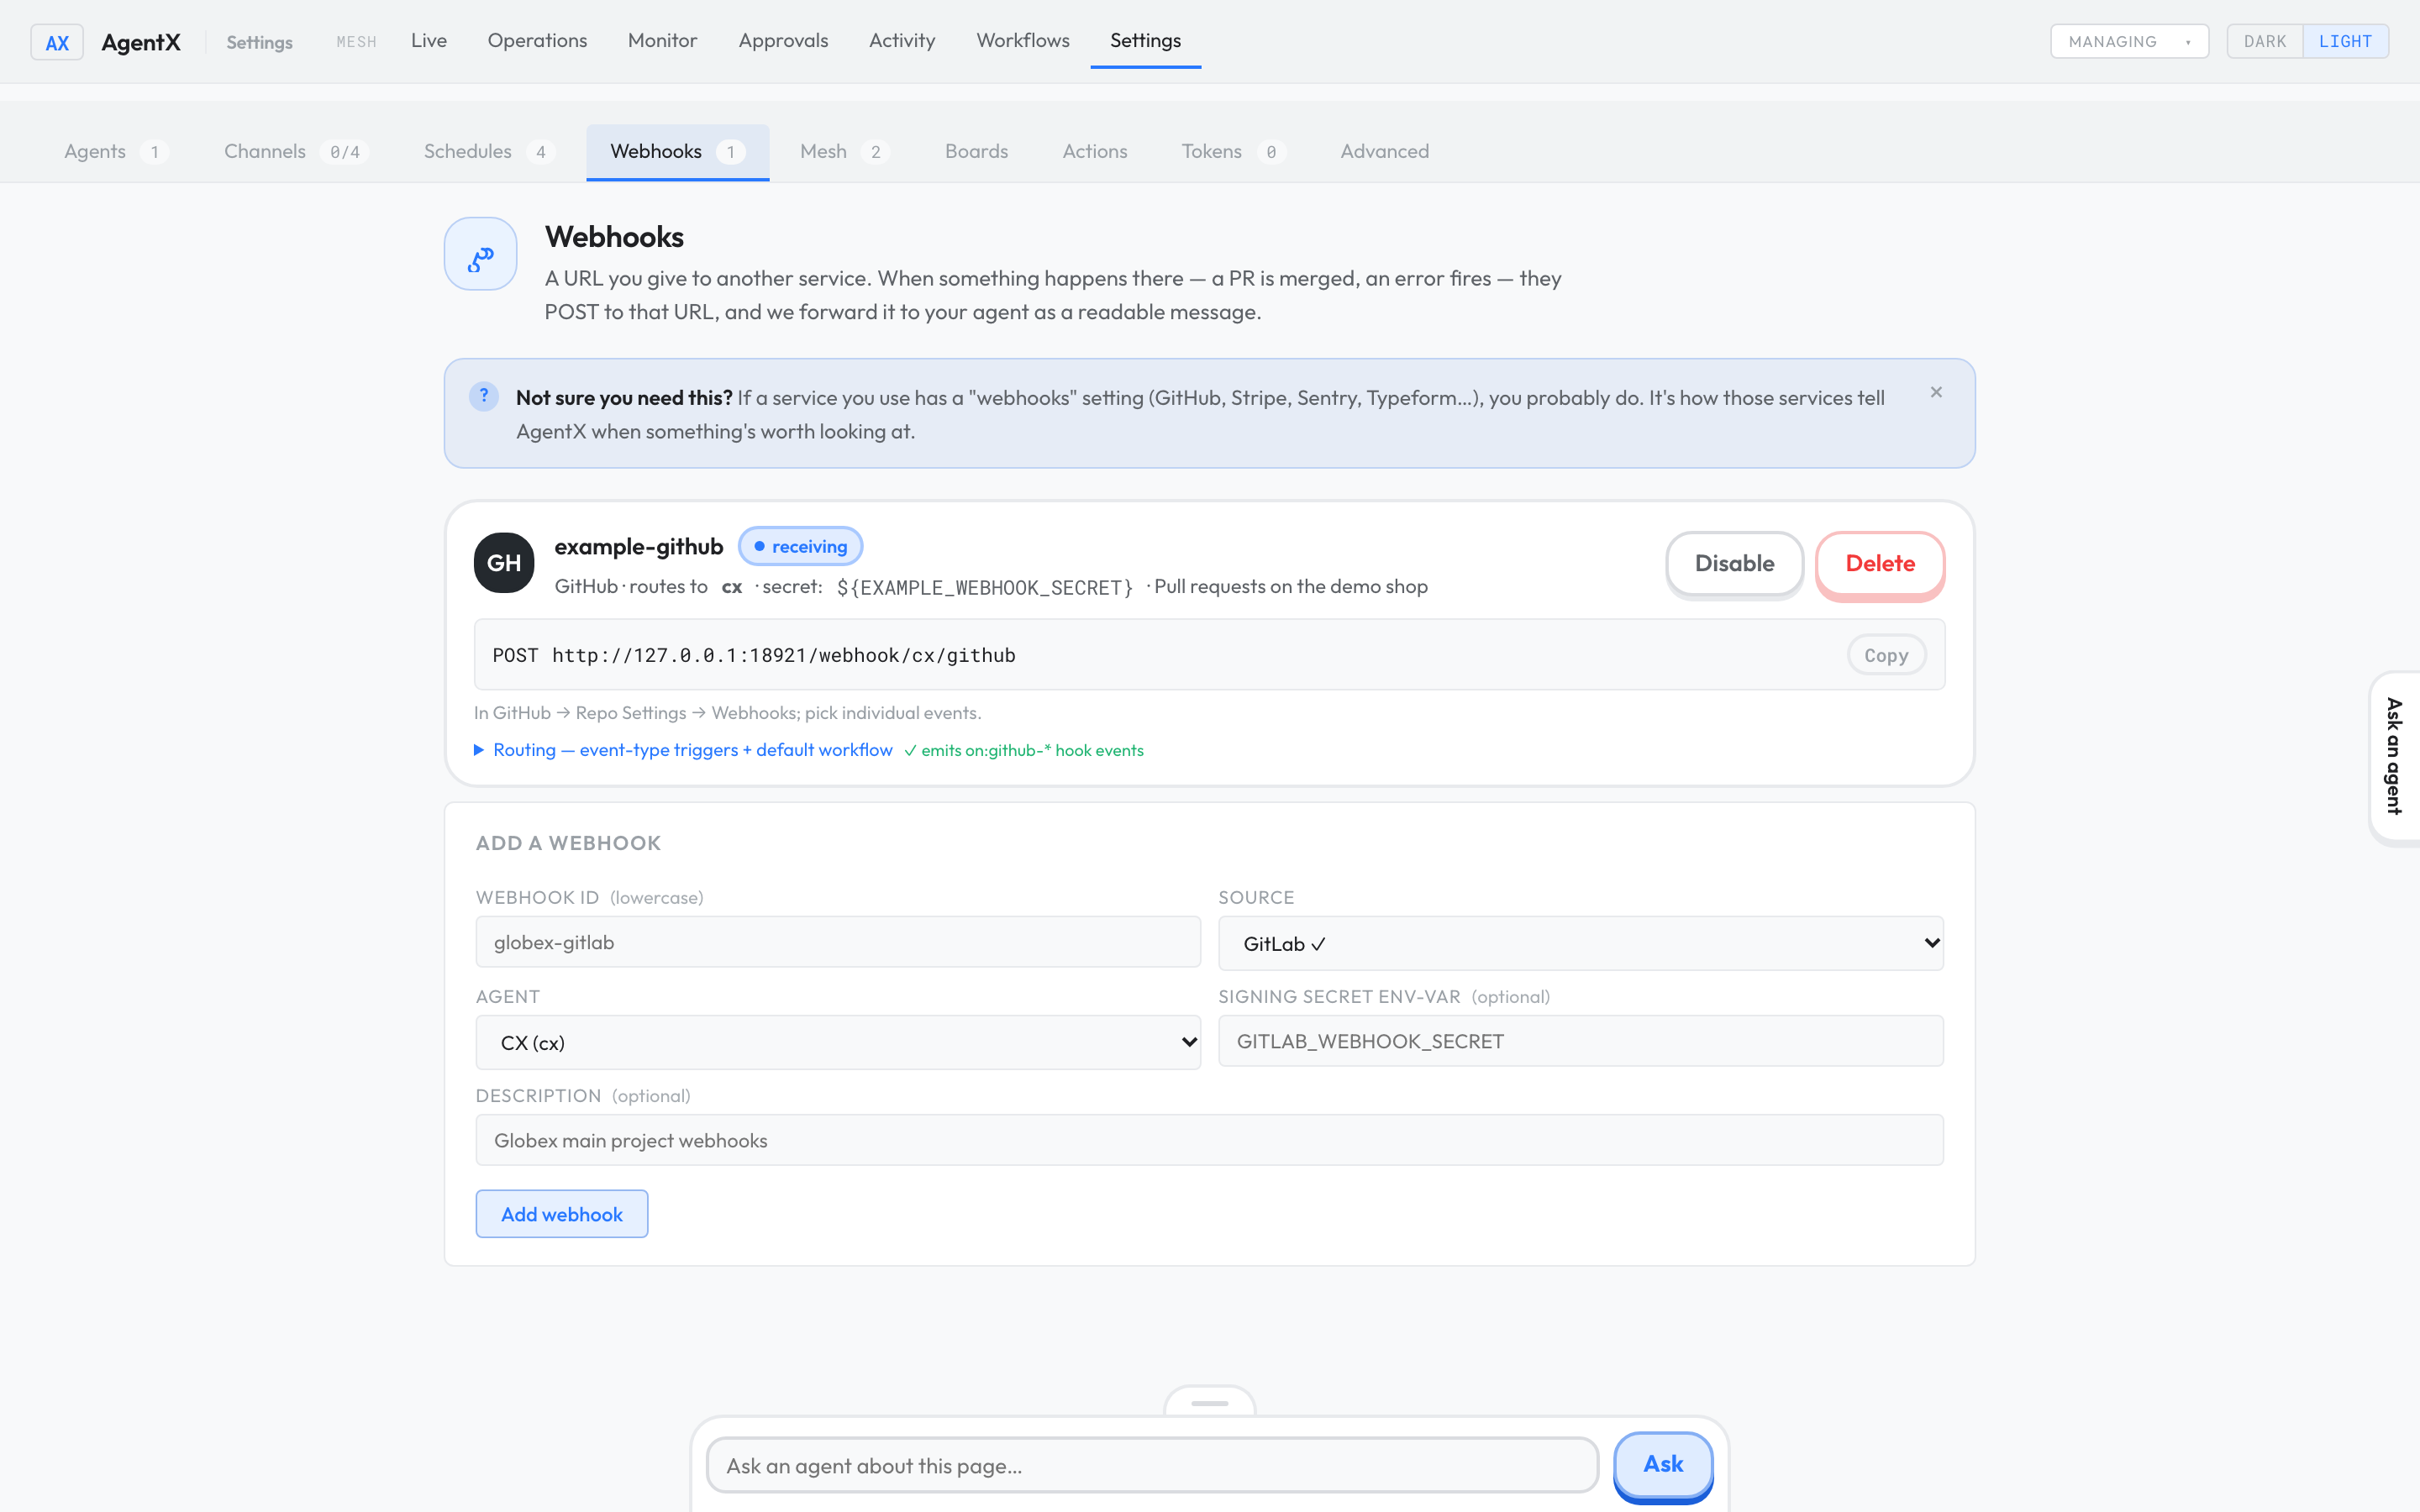
A webhook is an address you give to another service, such as GitHub, GitLab, Sentry or Stripe. When something happens there (a pull request opens, an error fires, an invoice is paid), that service sends a message to the address. AgentX turns it into a readable summary and hands it to the agent you picked.
Each webhook you add shows as a card with:
- a status: receiving, disabled, or signing secret missing (no secret is set, so anyone who knows the address can post to it);
- the address to copy, in the form
POST <daemon address>/webhook/<agent>/<source>, with a Copy button; - a short hint on where to paste it in that service;
- Disable / Enable and Delete buttons;
- a folded Routing — event-type triggers + default workflow section.
The form fields map to one entry in webhooks in agentx.json (reference):
| Field | Setting | What it means |
|---|---|---|
| Webhook id | id | A short name for this entry. Lowercase letters, digits, - and _ only. |
| Source | source | The service that will call. Sources marked ✓ (GitLab, GitHub, Sentry, Stripe, Vercel, Odoo, HubSpot) are fully supported. Discord, Slack and Custom are received but don't start workflow hooks. |
| Agent | agentId | The agent that gets the message. |
| Signing secret env-var | secretEnv | The name of a variable in .env that holds the shared secret, for example EXAMPLE_WEBHOOK_SECRET. When set, calls without the right signature are refused. |
| Description | description | A note for yourself. |
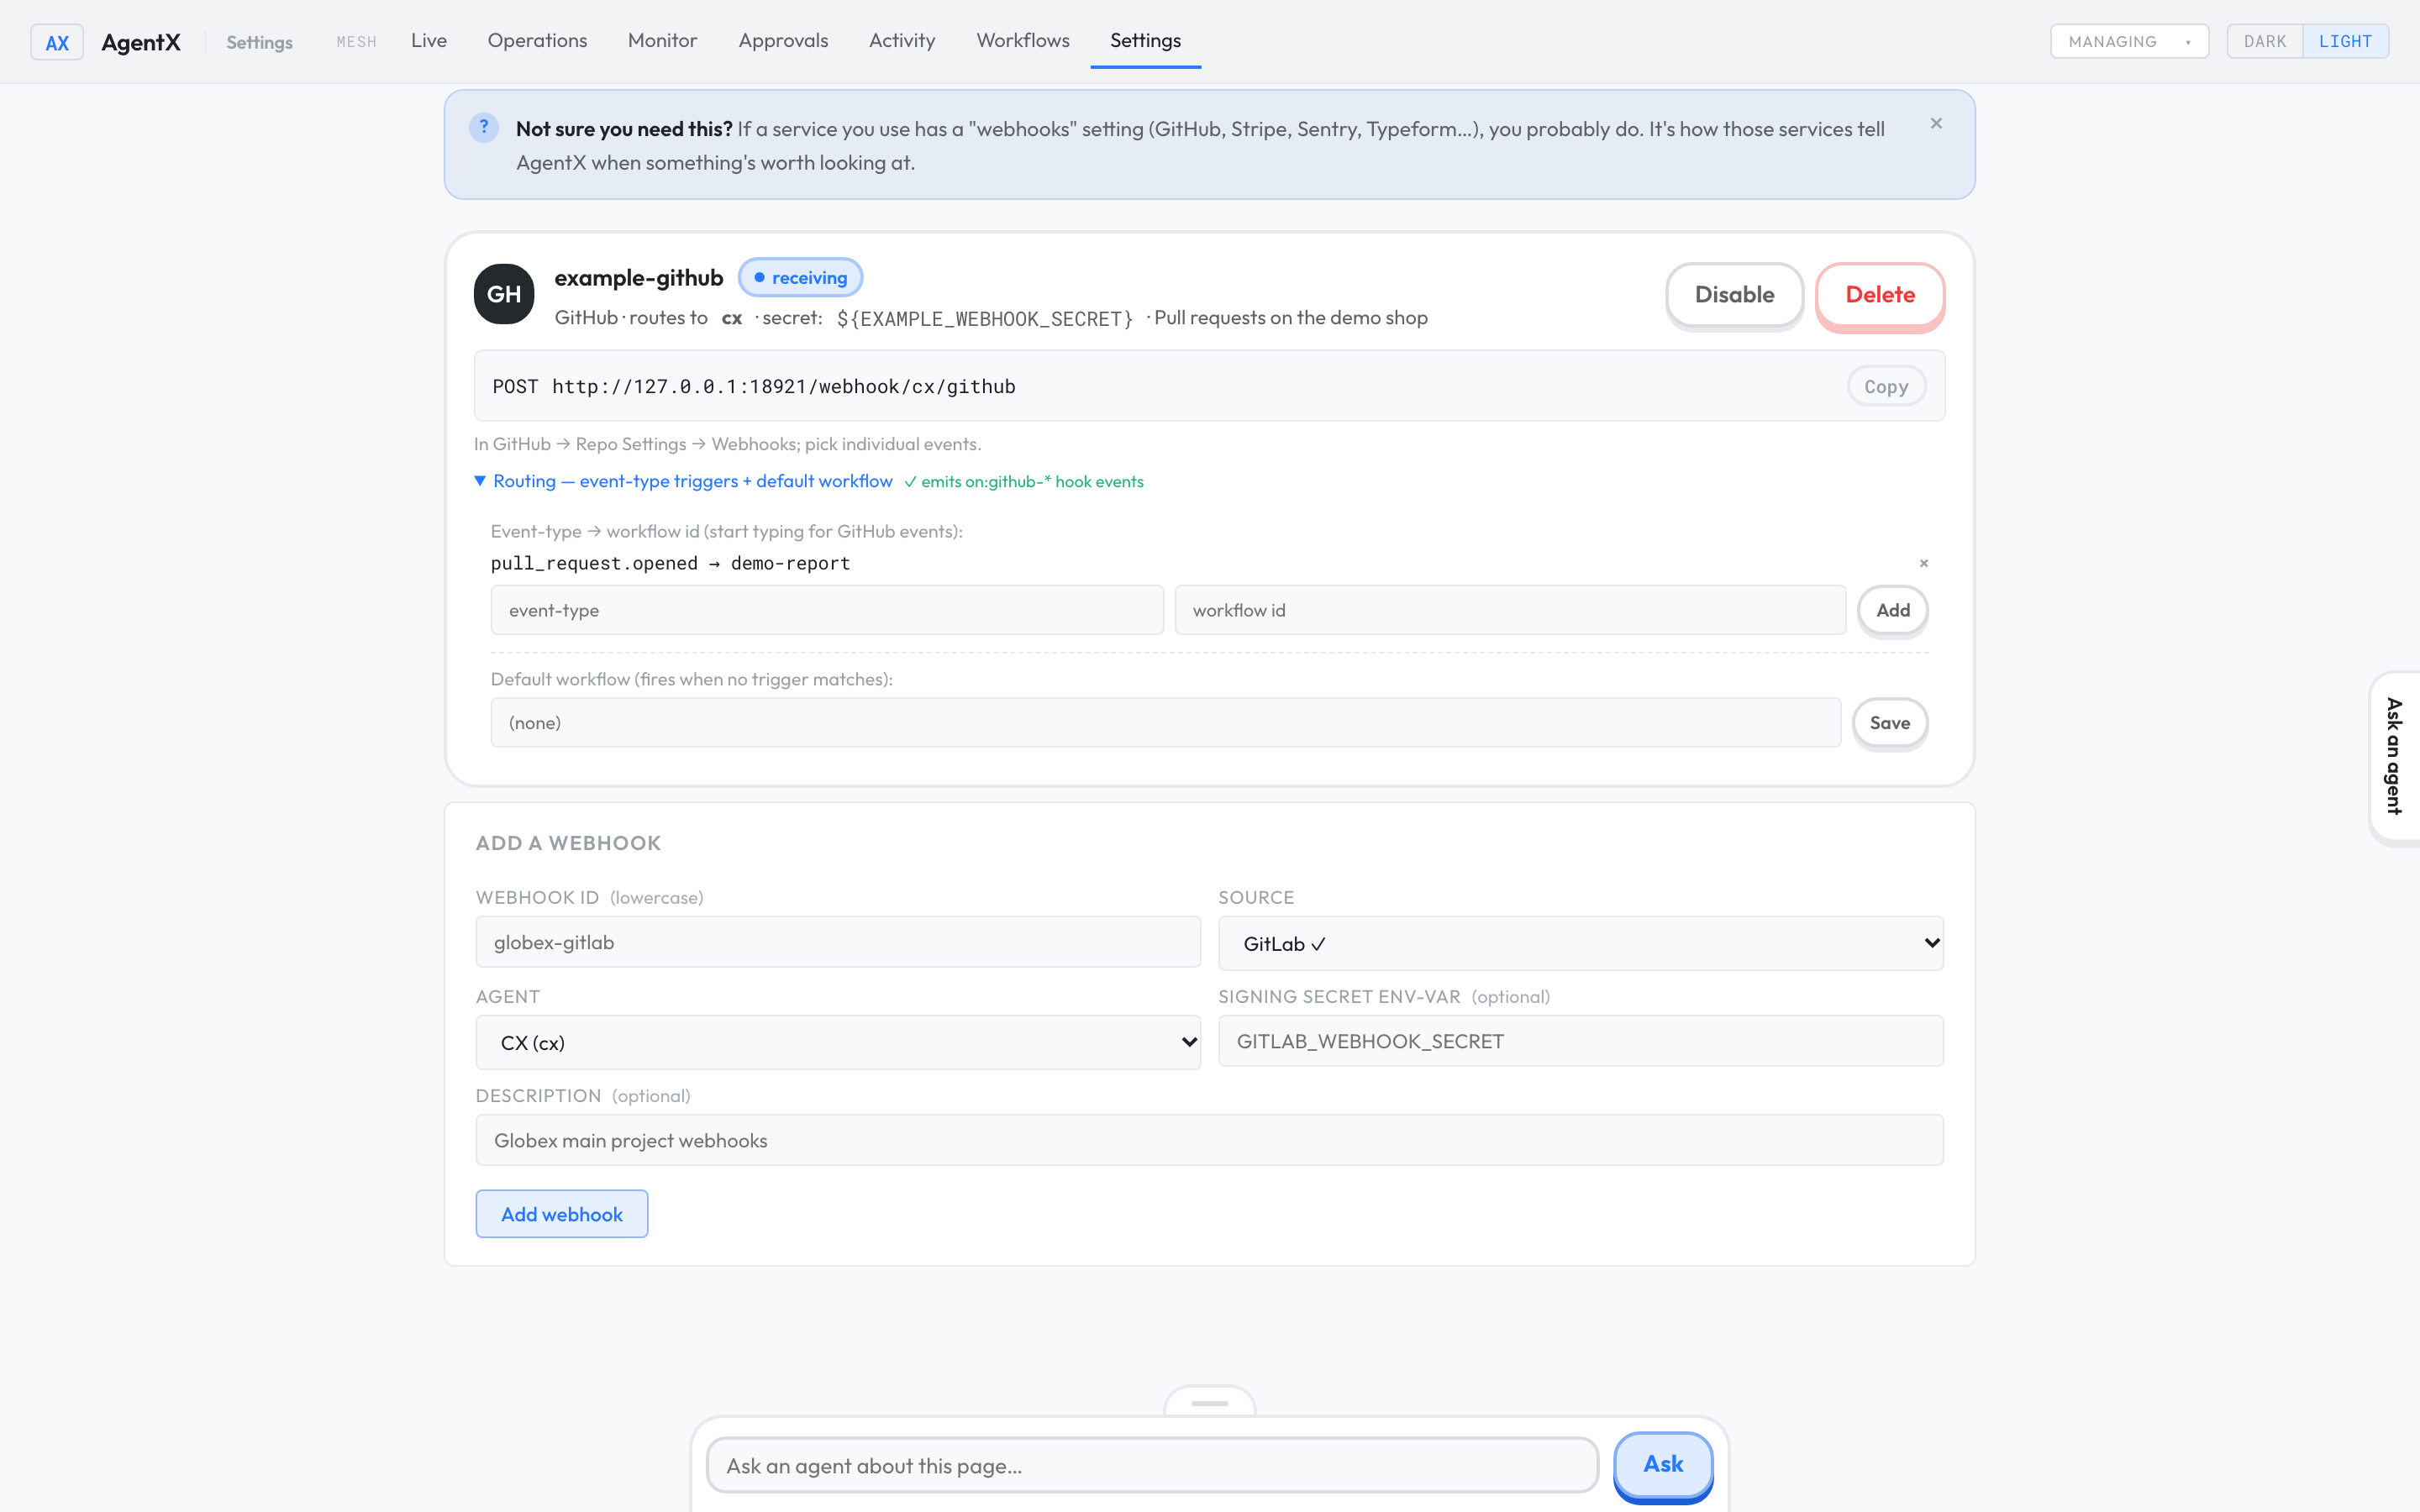
In Routing, you can send an event type to a workflow instead of the agent. An event type is the kind of event the service reports, such as issues.opened for GitHub. Each pair you add is saved under triggers. The Default workflow (defaultWorkflow) runs for events that no trigger matches. With neither set, the agent gets every event.
Add a webhook
- Terminal: add the shared secret to the
.envfile next toagentx.json, for exampleEXAMPLE_WEBHOOK_SECRET=<a long random value>. - Browser: in Settings, select Webhooks.
- Under Add a webhook, type a Webhook id, such as
example-github. - Pick the Source and the Agent.
- In Signing secret env-var, type the variable name from step 1, such as
EXAMPLE_WEBHOOK_SECRET. - Select Add webhook. The new card appears at the top.
- On the card, select Copy to copy the address.
- Browser: in the other service's webhook settings, paste the address and the same secret value, then save there.
To route events to workflows:
- Browser: on the webhook's card, open Routing — event-type triggers + default workflow.
- Type an event type (suggestions appear for supported sources) and a workflow id, then select Add.
- Optional: type a Default workflow and select Save.
The address must be reachable from the other service. A daemon that only listens on 127.0.0.1 can't be called from the internet.
Mesh
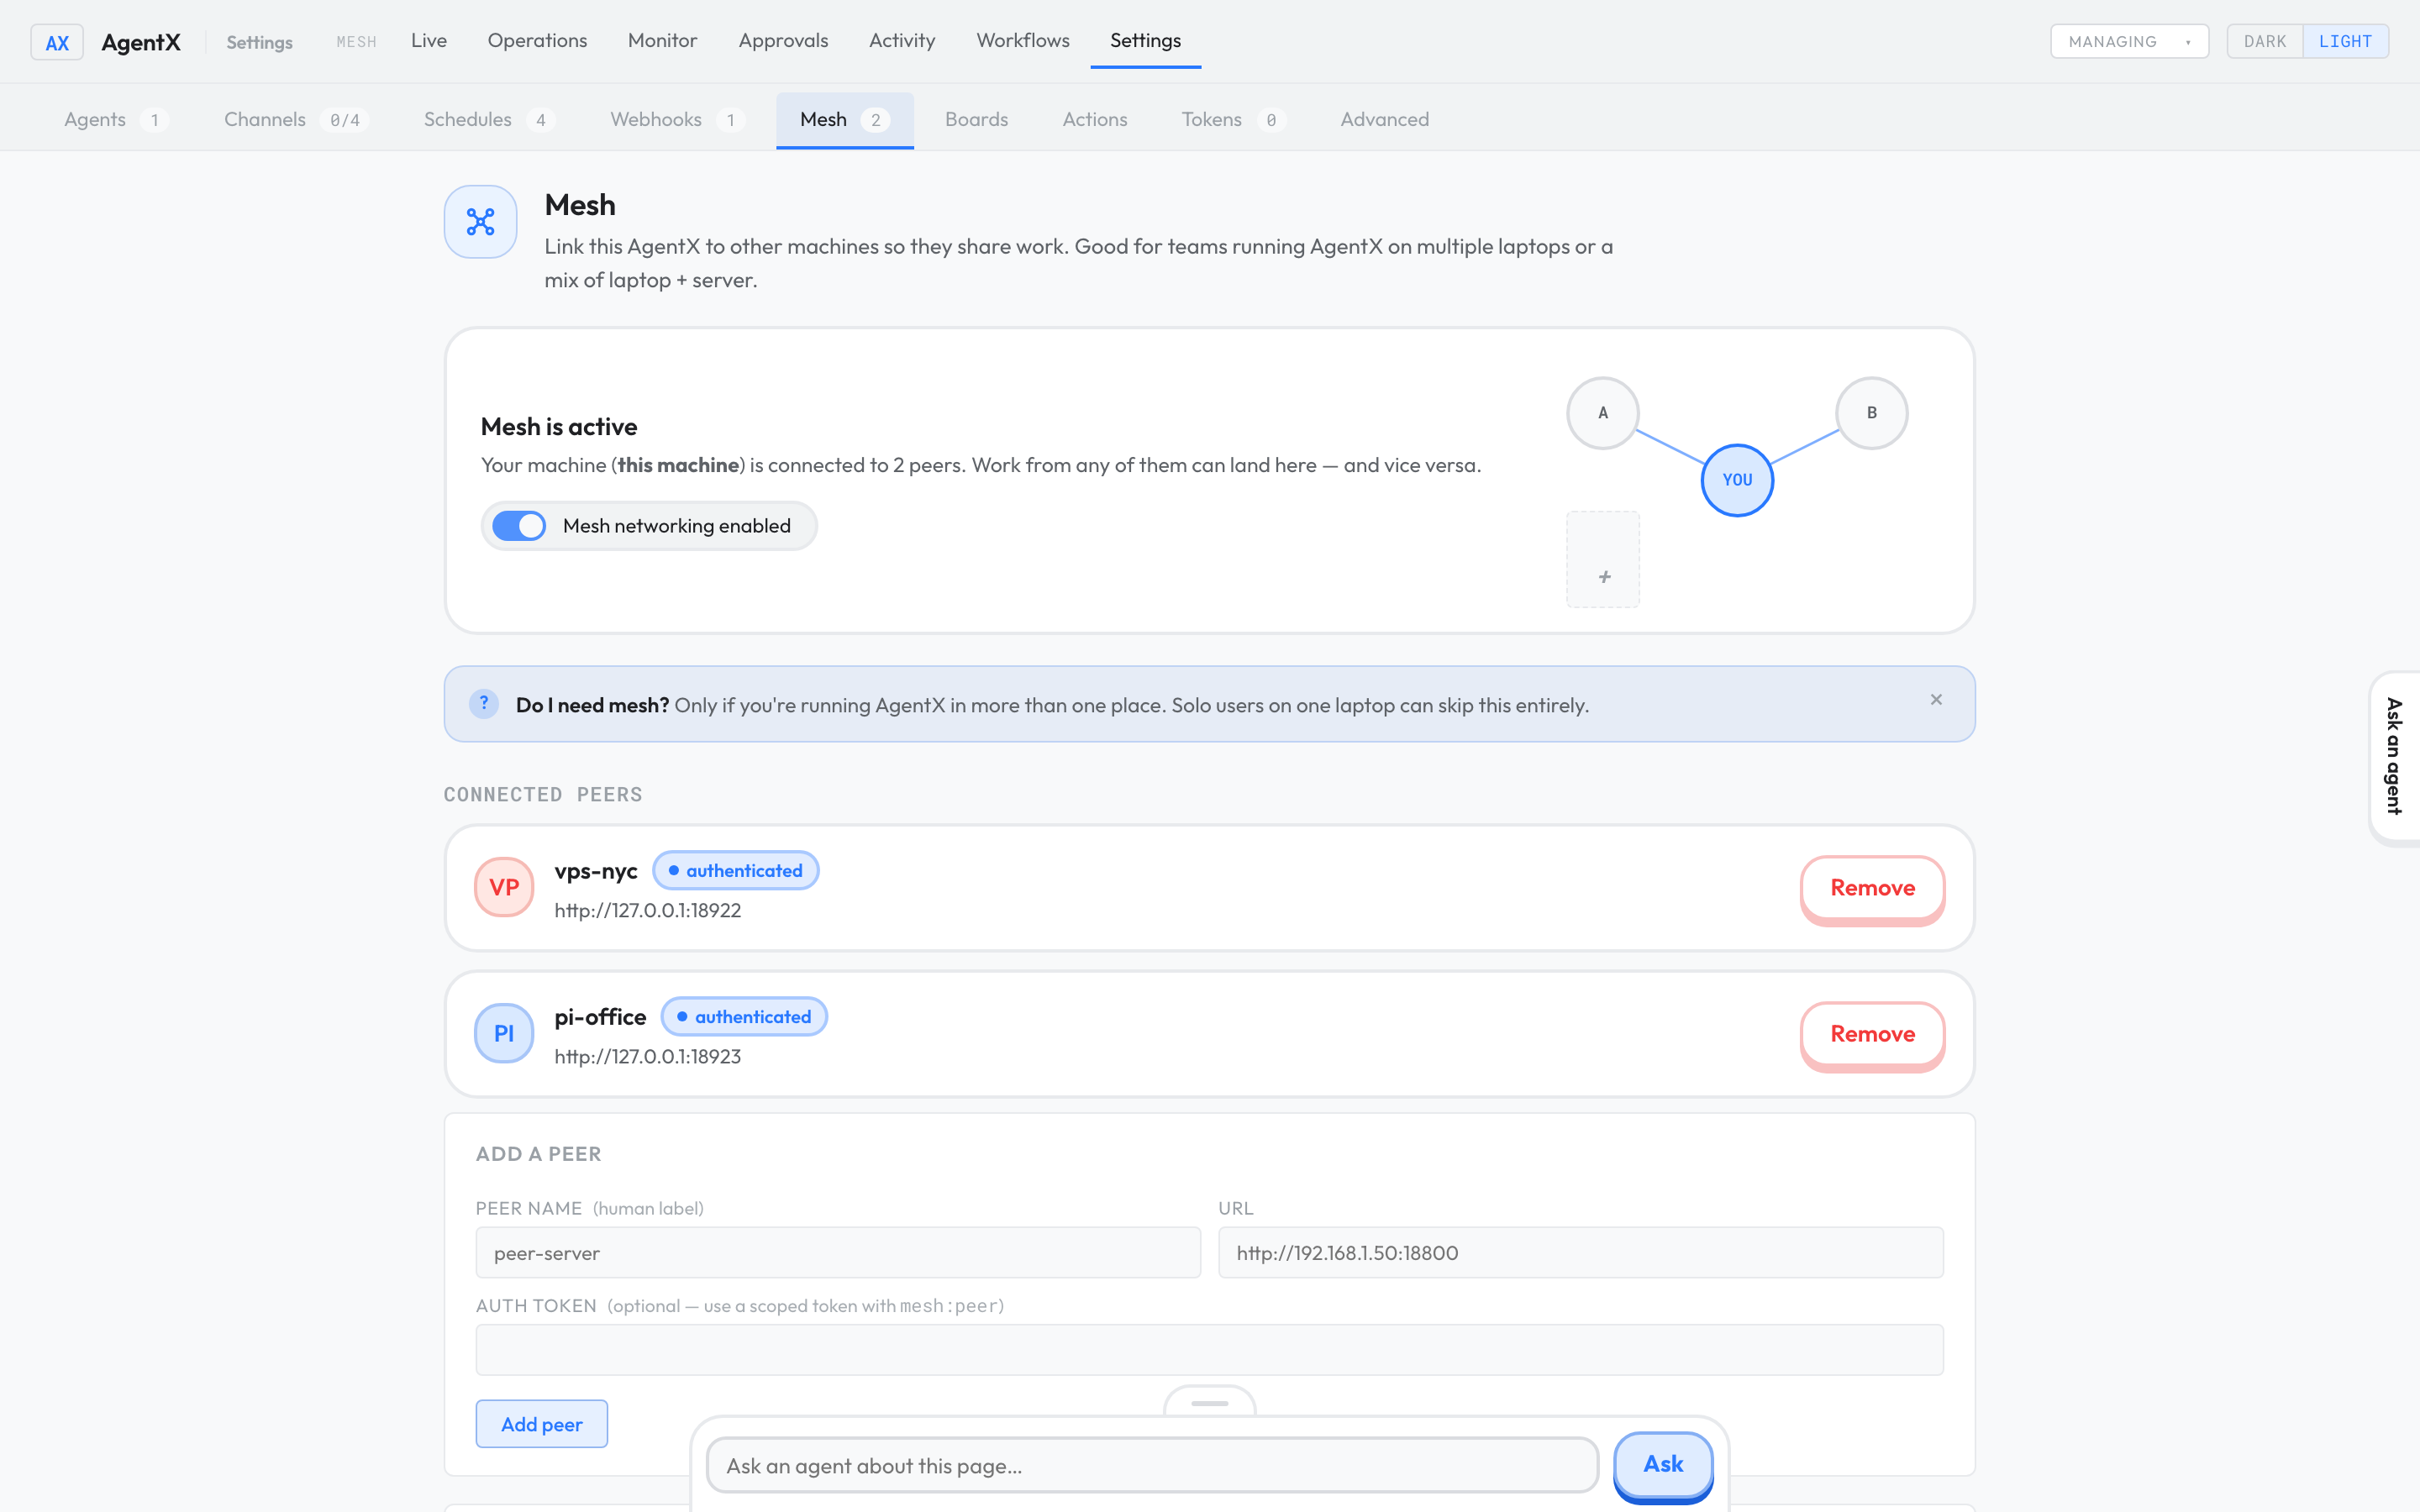
The mesh links this AgentX to AgentX on other machines, so agents on one machine can hand work to agents on another. You only need it if you run AgentX in more than one place. For the full walk-through, see Add a second machine.
The top card says whether the mesh is on (Mesh is off, Mesh is on, or Mesh is active when peers are listed) and has the Mesh networking enabled / disabled switch (mesh.enabled). Below it, Connected peers lists each peer (another AgentX machine) with its address, a Remove button, and a status: authenticated when a token is saved for it, no token when not.
| Field | Setting | What it means |
|---|---|---|
| Peer name | mesh.peers[].name | A label for the other machine. |
| URL | mesh.peers[].url | The other machine's daemon address, starting with http:// or https://, for example http://peer.example.com:18800. |
| Auth token | mesh.peers[].token | The token this machine sends to the peer. Use a token with the mesh:peer scope, created on the peer's Tokens tab. |
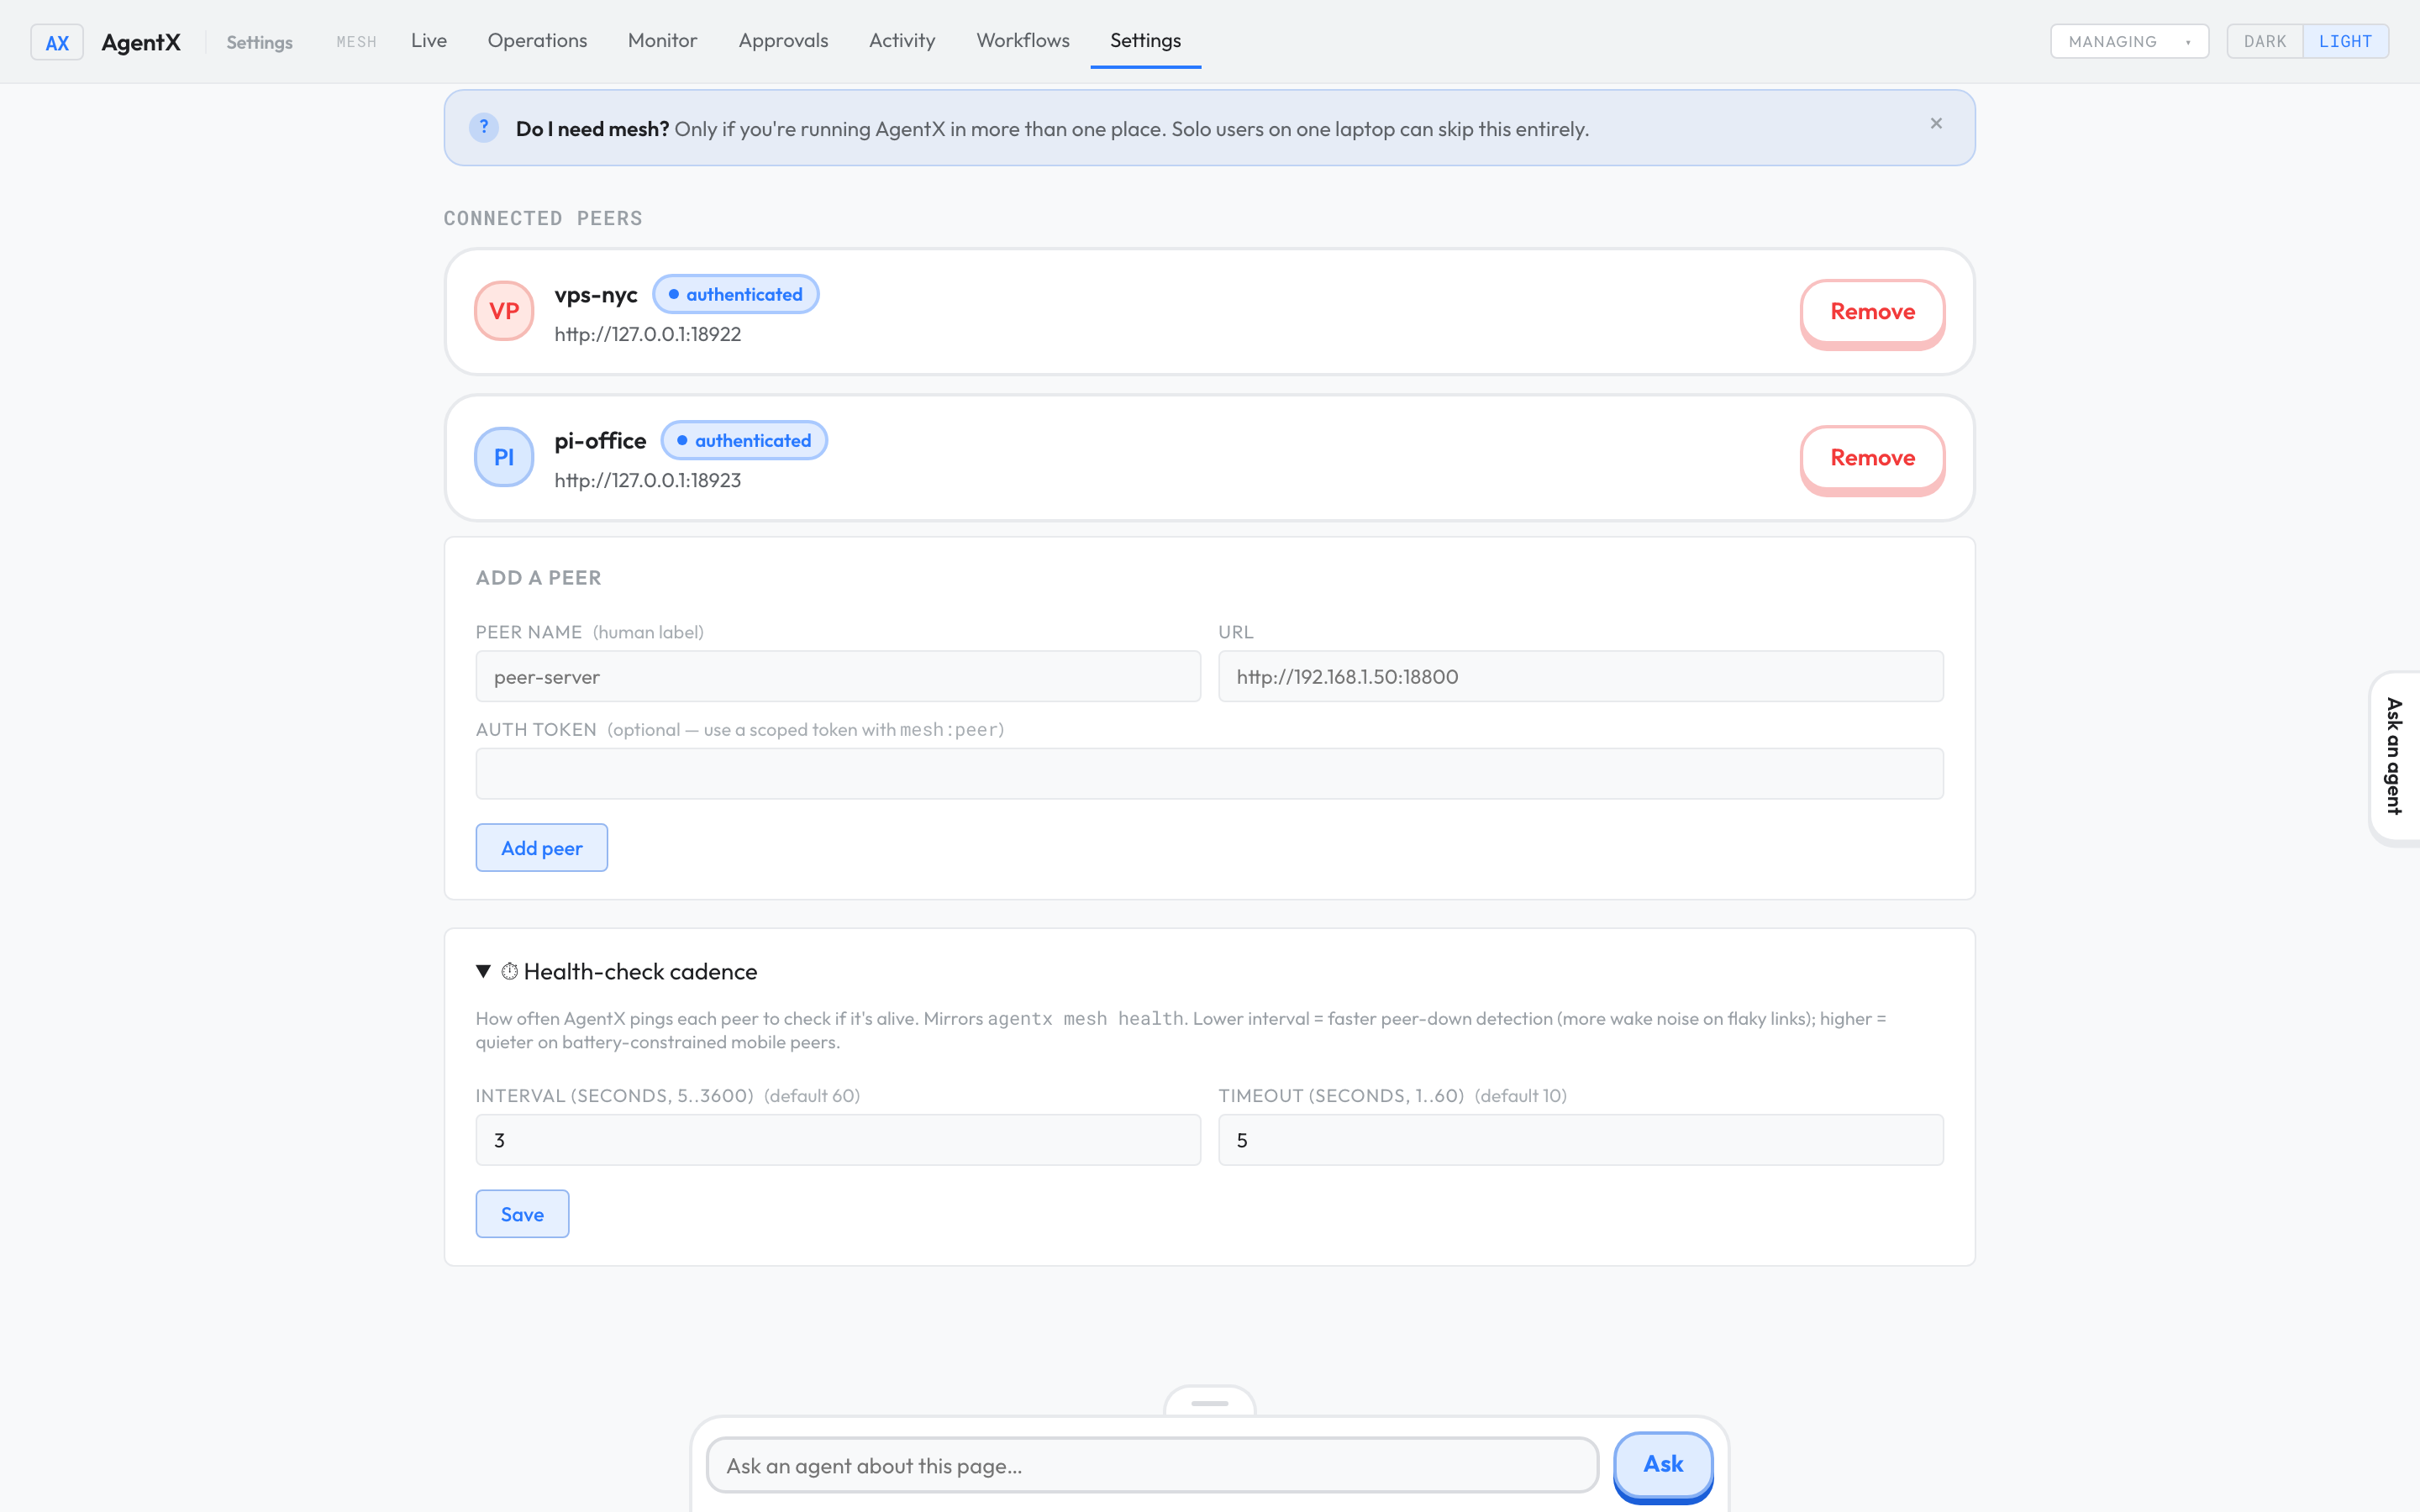
| Interval (seconds, 5..3600) | mesh.healthCheck.interval | How often this machine checks each peer is alive. Default 60. |
| Timeout (seconds, 1..60) | mesh.healthCheck.timeout | How long to wait for an answer. Default 10. |
See the mesh settings reference for every field.
Add a mesh peer
- Browser: on the other machine's dashboard, open Settings › Tokens and create a token with the
mesh:peerscope. Copy it. - Browser: on this machine, in Settings, select Mesh.
- Under Add a peer, type a Peer name.
- Type the other machine's URL.
- Paste the token into Auth token.
- Select Add peer. Adding a peer also switches the mesh on.
To change how often peers are checked:
- Browser: open ⏱ Health-check cadence.
- Change Interval or Timeout, then select Save.
Boards
The Boards tab (titled Kanban boards) sets up the task boards shown on the dashboard's Boards page (/boards). A board shows the issues of one or more GitLab projects as cards in columns. Moving a card to a column adds that column's GitLab label, for example Status::Doing. See the boards settings reference.
Each board is listed with its name and id, its projects, its label filter, its time windows, and its columns, with Edit and Remove buttons.
| Field | Setting | What it means |
|---|---|---|
| Board id | boards[].id | A short unique name, such as example. Saving with an id that already exists updates that board. |
| Display name | boards[].name | The name shown on the board. |
| GitLab project paths | boards[].source.projects | One or more projects, separated by commas, such as example-group/app,example-group/site. |
| Primary tool label | boards[].primaryToolLabel | Optional. Only issues with this label are shown, such as Tool::Example. |
| Open-window days | boards[].timeRangeDays | How far back open issues are shown. Default 30. |
| Closed-window days | boards[].closedWindowDays | How far back closed issues are shown. Default 30. |
A new board uses the standard columns: Open, To Do, Doing, On Hold, Review, Closed. Under a board, + add column adds your own column:
| Column field | What it means |
|---|---|
| Id | A short name for the column, such as doing. |
| Title | The heading shown on the board. |
| Kind | scoped-label (a label like Status::Doing), label (any plain label), open-backlog (open issues with no Status:: label yet) or closed (closed issues). |
| Scoped/label value | The label for scoped-label or label columns. Leave empty for the other kinds. |
Add a board
- Browser: in Settings, select Boards.
- Open + Add or update board.
- Type a Board id and a Display name.
- Type the GitLab project paths.
- Optional: type a Primary tool label and change the day windows.
- Select Save board. The board appears in the list.
- Optional: under the board, open + add column, fill in Id, Title, Kind and Scoped/label value, then select Add.
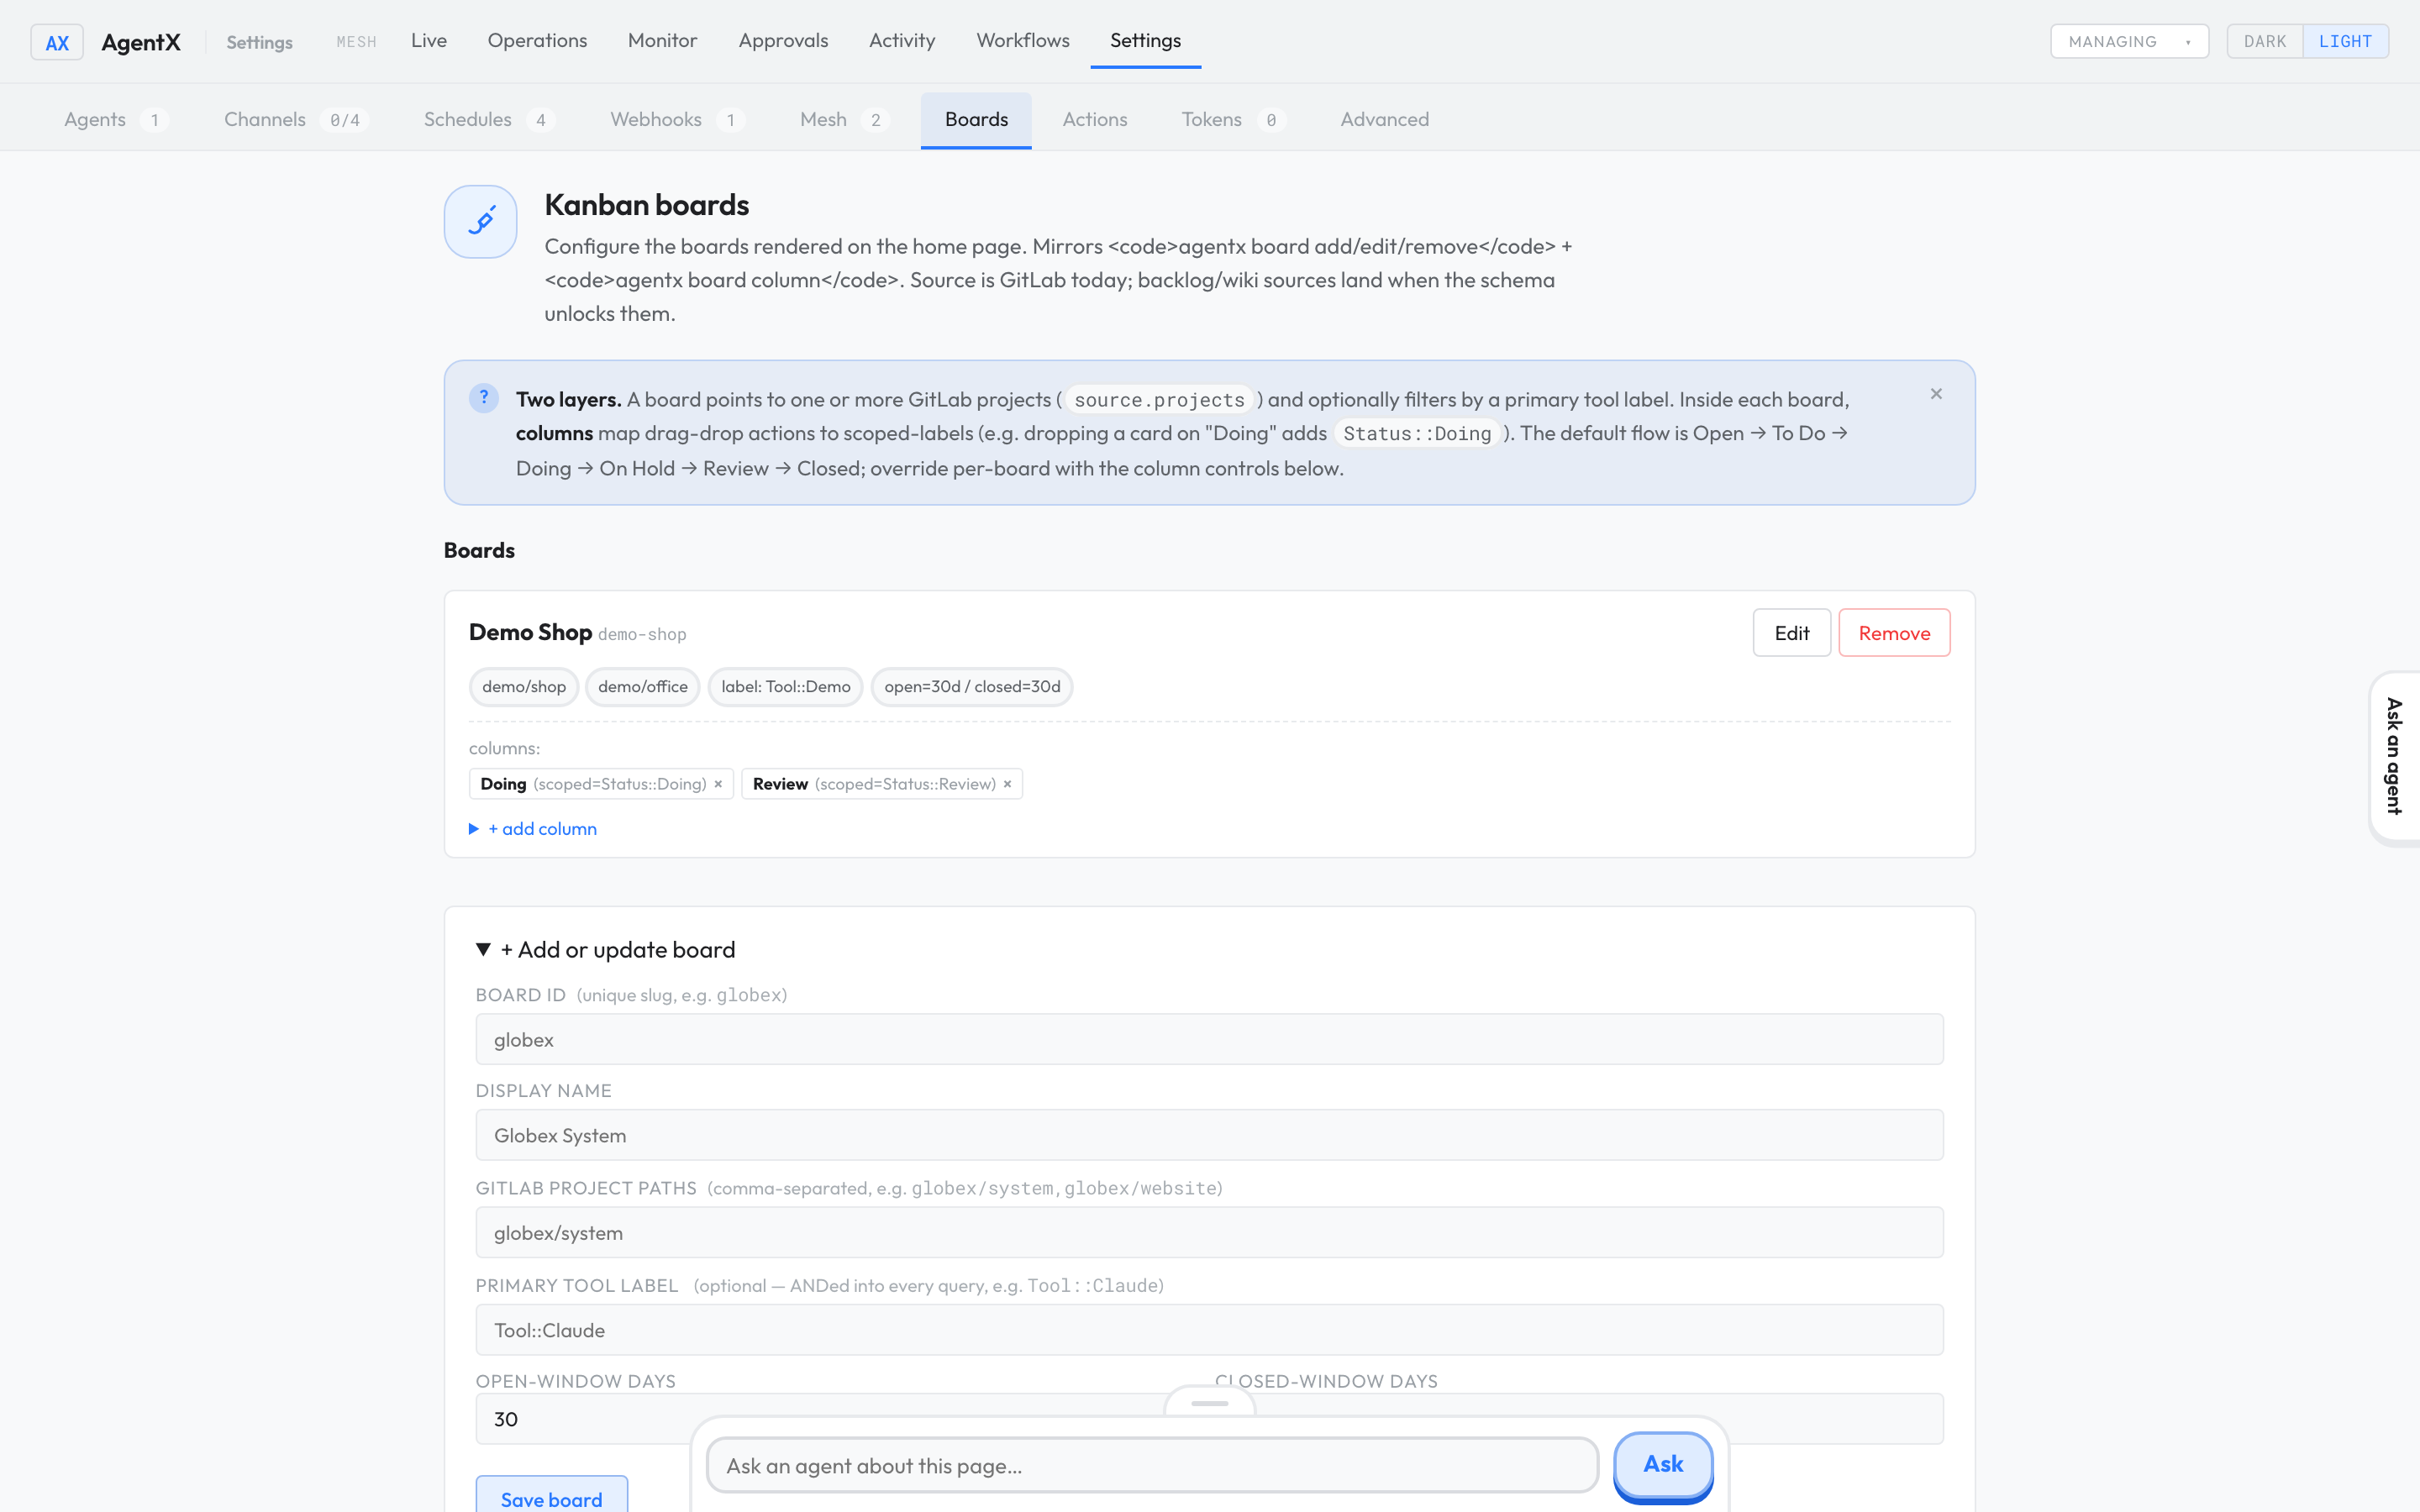
A board reads issues with the GitLab token of the GitLab channel (channels.gitlab.token). Set up GitLab on Channels first, or the board shows an error.
Actions
The Actions tab (titled Action registry) holds reusable actions: a shell command run on the machine where the daemon runs, or a call to a web address. Workflows run them by id, and you can run one from here to test it. The same list is managed from the terminal with agentx actions. Actions are saved as files in .agentx/actions/, not in agentx.json.
| Field | What it means |
|---|---|
| Id | A short unique name, such as deploy-staging. Saving an existing id updates it. |
| Title | The name shown in the list. |
| Description | Optional note. |
| Kind | shell (run a command) or http (call a web address). |
| Command | For shell: the command. $NAME by a variable from the daemon's environment. |
| Working directory | For shell, optional: the folder the command runs in. |
| URL, Method | For http: the address and the method (POST, GET, PUT, PATCH, DELETE). |
| Headers | For http, optional: extra headers as JSON, such as {"Authorization":"Bearer $EXAMPLE_TOKEN"}. |
| Body | For http: the text sent. Not sent for GET and DELETE. |
| Inputs | Values the action takes, separated by commas, as name:type. Types are string, number and boolean; add ! to make one required, such as version:string!,dryRun:boolean. |
| Timeout (ms) | How long the action may run, in milliseconds. Default 30000 (30 seconds). |
Output longer than 32 KB is cut.
Add and test an action
- Browser: in Settings, select Actions.
- Open + Add or update action.
- Type an Id and a Title.
- Pick the Kind, then fill in Command (for
shell) or URL and Method (forhttp). - Optional: list the Inputs.
- Select Save action. It appears under Registered actions.
- On the action, open ▶ Run, fill in any inputs, and select Run now.
- Read the result:
okorfailed, the status and the time taken, then the output below.
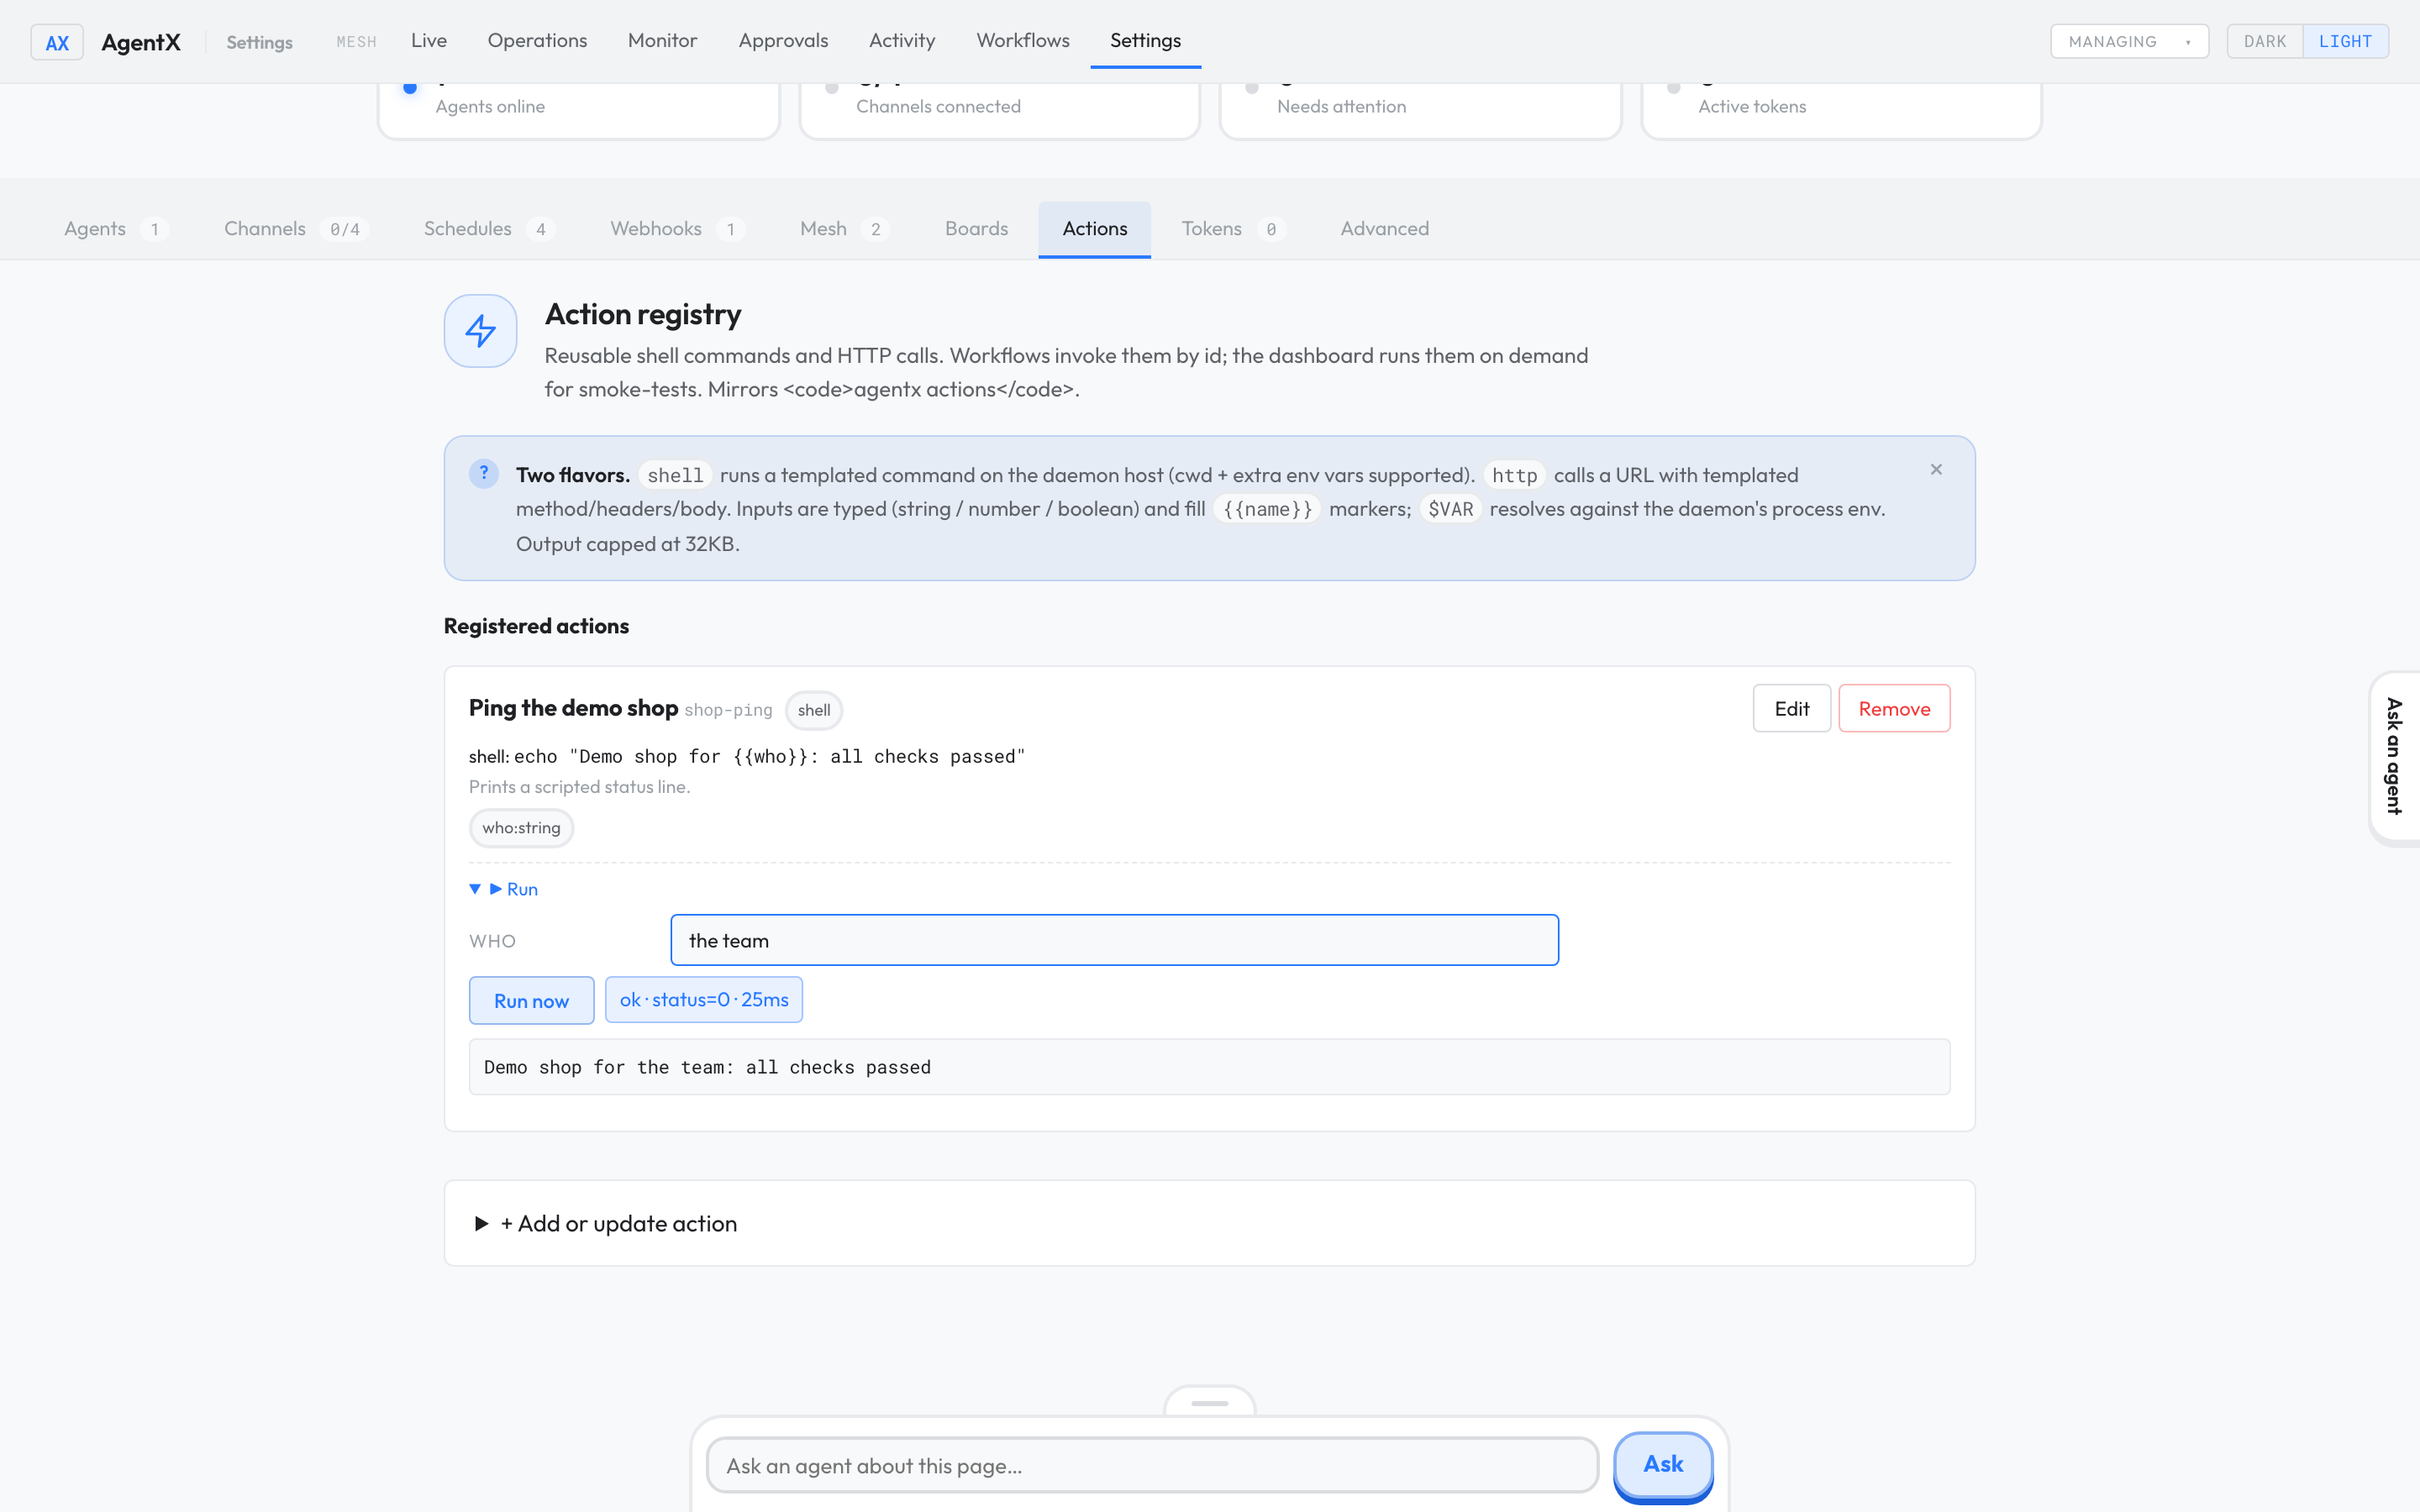
A shell action runs with the daemon's permissions on that machine. Only add commands you would run yourself.
Advanced
The Advanced tab (titled Raw configuration) shows the whole agentx.json file. Every other tab writes to this file. Use it for changes the other tabs don't offer, or to read everything at once. Field meanings are in the configuration reference.
The toolbar has:
- a search box, Search keys & values…;
- three views: Tree (folded, readable), Raw (plain text) and Edit (change the text);
- Expand all, Collapse all and Save.
Below the viewer, Save config saves and Reload from disk throws away unsaved edits and reads the file again.
The file can contain credentials. Don't share screenshots of this tab.
Change a setting by hand
- Browser: in Settings, select Advanced.
- Select Edit.
- Change the value in the text. Keep the JSON valid: quotes around text, commas between entries.
- Select Save config. The message names the backup it made,
agentx.json.bak.<number>, next to the file. - Terminal: in the folder with
agentx.json, runagentx config checkto confirm the file is still accepted.
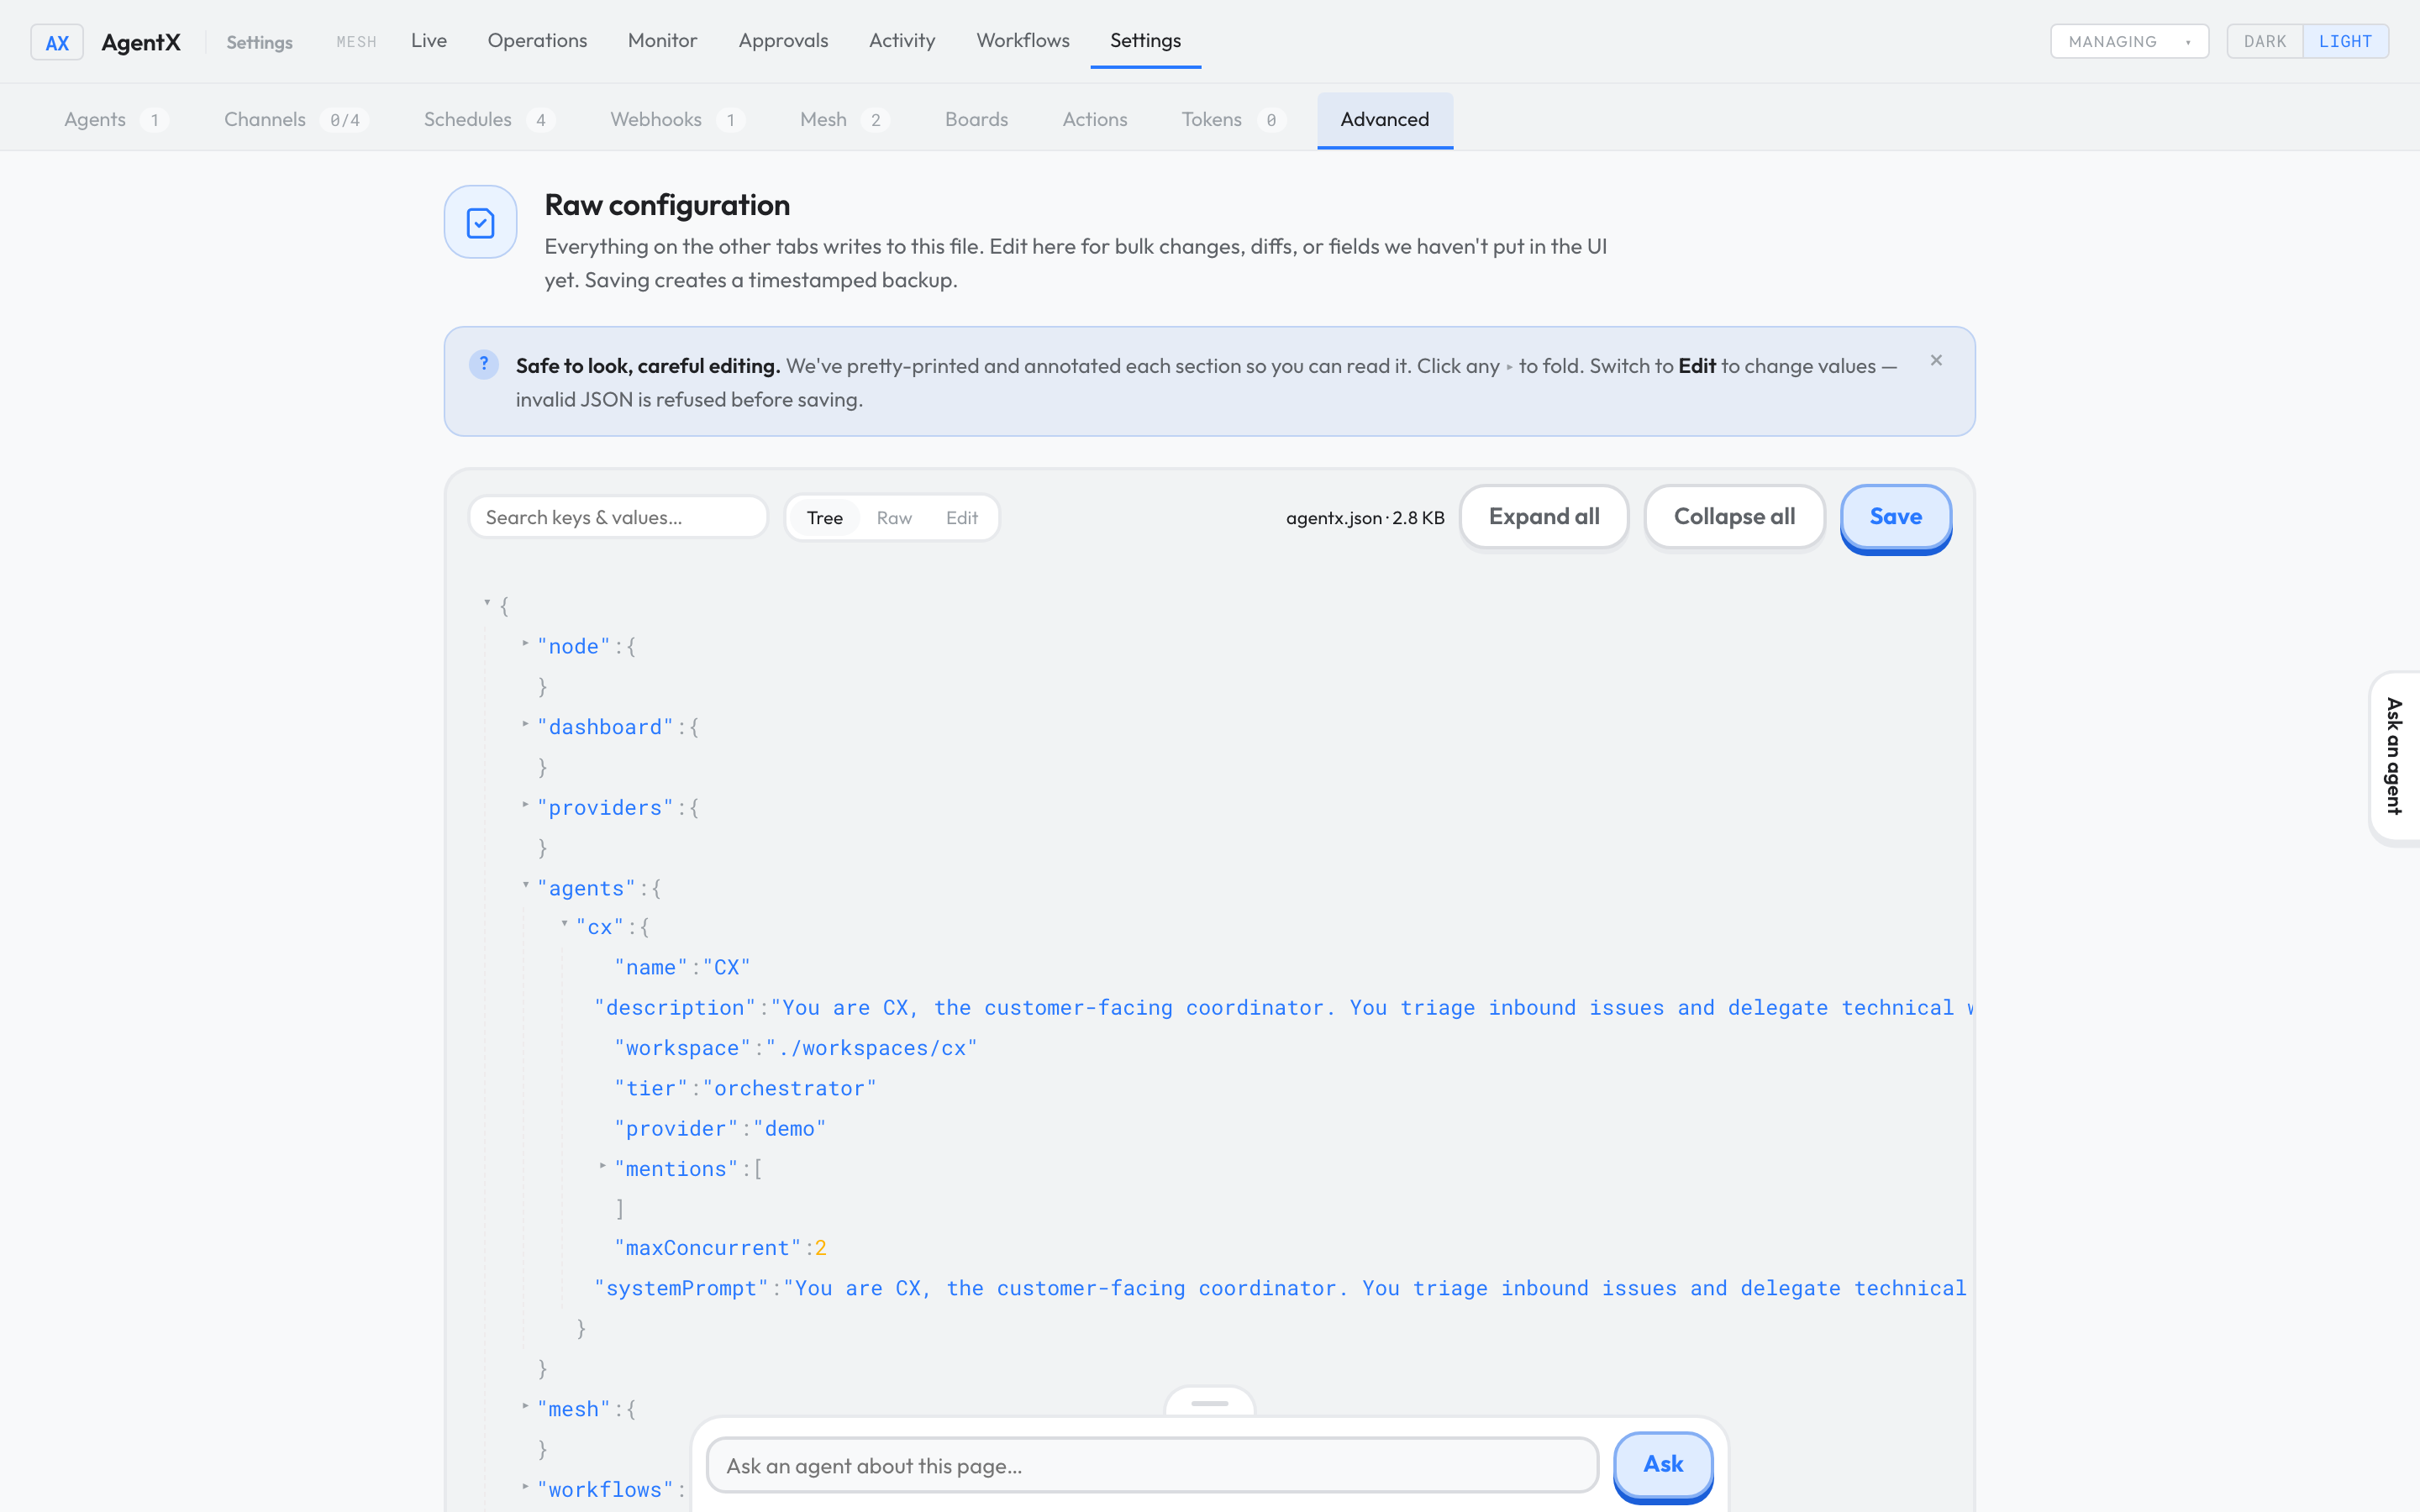
Text that is not valid JSON is refused and nothing is saved. A value that is valid JSON but not an accepted setting is saved, and the daemon only reports it when it reloads, so always run step 5.
Check it worked
- Browser: after you save a change, reload Settings. Your change is still there.
- Browser: open Advanced. The same value appears in the settings file.
- For an agent or channel change, send the agent a test message and watch it on Live.
If something is wrong
- Saving shows an error: the value isn't valid (for example, an agent id with spaces). Fix it as the message says and save again. Nothing is written until the value is valid.
- The change doesn't take effect: the daemon may be stopped. Terminal: run
agentx daemon status. If it's running, restart it; some changes, such as an agent's model, only apply after a restart. See Restart without losing work. - A channel card says off or not set up: open it and finish its setup, and make sure its token is in
.env. - A webhook card says signing secret missing: type the variable name in Signing secret env-var when you add it, or set
secretEnvfor it on Advanced. Then put the value in.env. - The other service gets
401from a webhook: the secret it sends doesn't match the value in.env, or the variable named insecretEnvis missing from.env. Fix it, then restart the daemon so it reads.envagain. - A mesh peer says no token: remove it and add it again with a
mesh:peertoken from the other machine. - A board shows an error: check that GitLab is set up on Channels with a token, and that the project paths are spelled as in GitLab.
- An action shows
failed: read the output under Run now. Forshellactions, run the same command in a terminal on the daemon's machine to see the full error. - Advanced says
Invalid JSON: the text has a typo, often a missing comma or quote. Fix the line it names, or select Reload from disk to start again. - Lost a token: it can't be shown again. Create a new one, then select Revoke on the old one.